

Purpose of this Guide
Welcome to the Network of Brokers guide for Peer Global File Service (PeerGFS). This document is designed to introduce you to the Network of Brokers, providing an overview of its feature set, user interface, benefits, and guiding you through the process of creating a broker network.
It is assumed that you have a general familiarity with installing and using PeerGFS. This guide specifically focuses on the Network of Brokers and does not cover the broader capabilities of PeerGFS. If you are unfamiliar with installing PeerGFS, please consult your Peer Software point-of-contact. For more information about other PeerGFS features and settings, refer to the PeerGFS User Guide.
Introducing the Peer Management Broker Network
The Peer Management Broker is an essential technology within PeerGFS, serving as the central messaging system that facilitates communication between Peer Agents and the Peer Management Center (PMC). By deploying multiple brokers, a robust and integrated network of brokers is formed. This network operates efficiently over local or wide-area networks using TCP/IP.
Deploying multiple instances of the Peer Management Broker across an infrastructure provides several benefits, including enhanced optimization and control over replication traffic flow, particularly in complex deployment scenarios:
-
Global File Server Deployments: Ideal for customers with file servers distributed across multiple continents. For example, deploying the PMC in a US data center with additional brokers in Europe and Asia allows direct replication traffic between these regions. This setup avoids the inefficiencies of routing all traffic through the US, reducing latency and improving performance.
-
Cloud Infrastructure Deployment: Beneficial for customers utilizing public cloud infrastructure. On-premises brokers can be deployed to manage and reduce ingress and egress charges associated with replication traffic, optimizing costs.
-
Active-Passive Failover Deployment: Enhances system resilience by providing a robust failover mechanism. Ensures continuous operation and minimal downtime by automatically rerouting replication traffic in case of broker failures.
Advantages of Deploying Multiple Peer Management Brokers
Deploying multiple Peer Management Brokers offers several advantages for efficient data replication and communication across diverse and distributed environments:
-
Improved Performance: By localizing replication traffic, brokers reduce the load on central data centers and enhance overall system performance.
-
Cost Optimization: Minimizes data transfer costs in cloud environments by strategically placing brokers to manage traffic flow.
-
Scalability: Facilitates the expansion of PeerGFS across multiple regions and infrastructures without compromising performance or reliability.
-
Resilience and Redundancy: The network of brokers ensures that the system remains operational even in the event of individual broker failures, providing robust failover capabilities.
Optimizing PeerGFS Deployment Using the Network of Brokers Capability
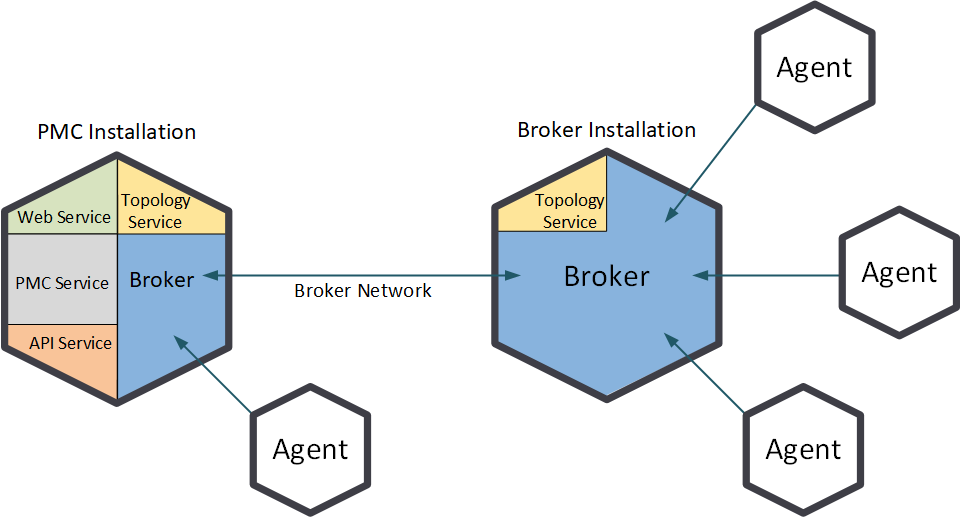
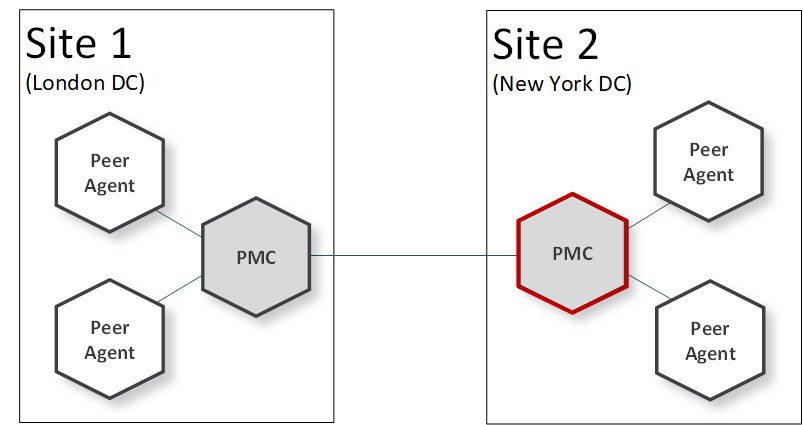
In a standard PeerGFS deployment, all Agents connect to a single broker integrated with the PMC installation. In a deployment that uses the Network of Brokers capability, multiple brokers are deployed across multiple sites, allowing you to choose which Agents connect to which broker. Every broker deployment includes a Topology Service, which is responsible for configuring the local broker and reporting its status to the PMC. Configuring brokers and viewing their statuses can be done from the Topology perspective within the PMC UI. In the following setup, the broker network comprises three brokers: one installed on the same server as the PMC and two installed on different servers.
PeerGFS Topologies
A PeerGFS topology refers to the structured arrangement of various components within a PeerGFS deployment. The primary components of a PeerGFS topology include sites, brokers, and Agents. Each of these components plays a specific role in ensuring data consistency and availability across different locations or regions. Here's an overview of how these components are structured and function together:
-
Sites
-
Definition: Sites represent distinct geographic or logical locations within a PeerGFS deployment. Each site can be a separate office, data center, or cloud region.
-
Role: Sites help organize and manage the distributed nature of the network. They serve as the physical or logical groupings where brokers are deployed and managed.
-
-
Brokers
-
Definition: Brokers are the nodes within a site that facilitate communication and data transfer.
-
Role: Brokers handle requests from Agents. They act as intermediaries, connecting Agents to the broader broker network. The role of a broker is to facilitate communication between Agents and the PMC, providing a reliable messaging system.
-
-
Agents
-
Definition: Agents are software components that reside either directly on Windows file servers or on servers alongside NAS devices. They connect to brokers and perform the actual file management tasks at the direction of the PMC.
-
Role: Agents connect to a broker within the PeerGFS environment to receive instructions, share updates, and handle data transfers. They ensure that the local file systems are kept consistent with the global file system managed by the PMC.
-
Topology Examples
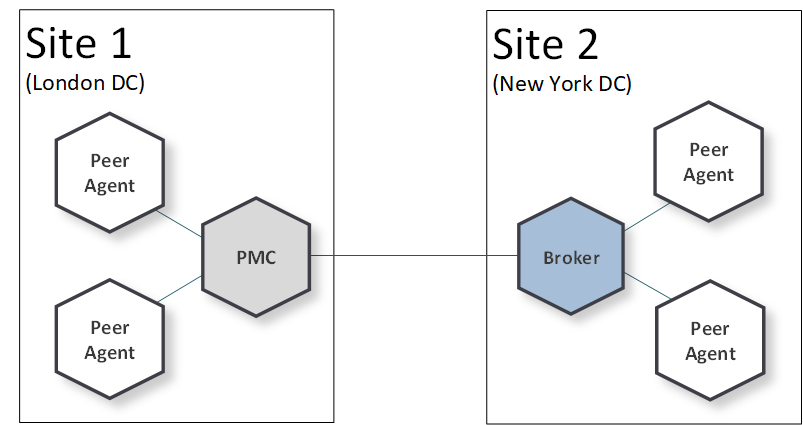
Example 1: Multi-Site Deployment
This topology has a broker on each site (including the one integrated with the PMC installation). The Agents on Site 1 (London) communicate with the broker included in the PMC, while the Agents on Site 2 (New York) communicate with the broker deployed on that site. The benefit of this configuration is that data transferred between Agents on the same site is kept local.
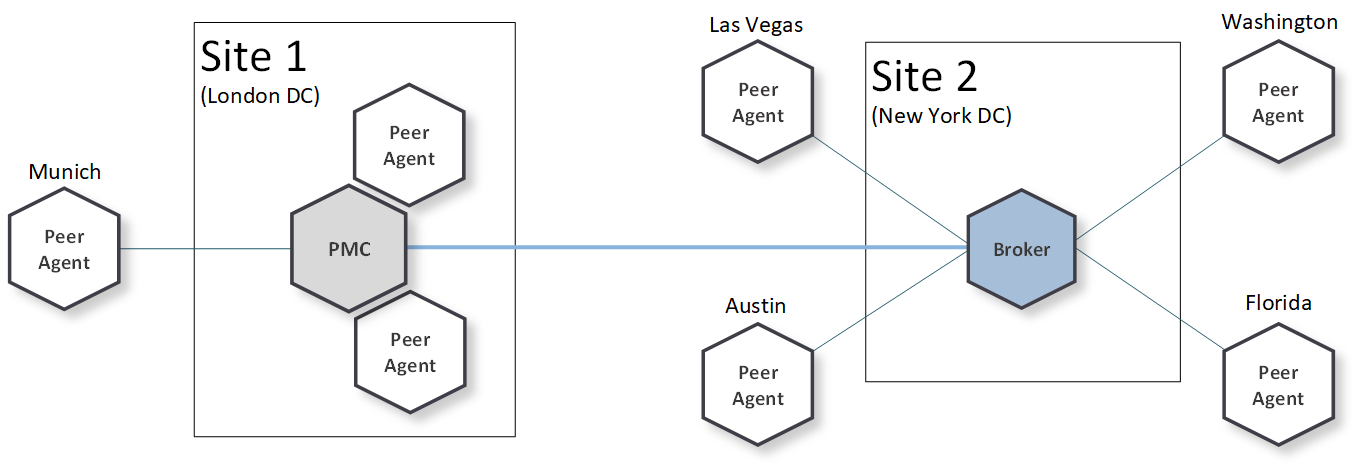
Example 2: Multi-Site Deployment with Regional Brokers
In this topology, there are also two sites and two brokers. However, not all of the Agents are in the same location as a broker. Both sites have Agents that are located within the same region.
-
The Agents on Site 1 (London) communicate with the broker within the PMC installation; in addition, a third Agent (Munich) communicates with the same broker.
-
In Site 2 (New York), a second broker is deployed at the data center to handle Agents distributed across the US.
The benefit of this configuration is that data can be transmitted among Agents in the US region without impacting Site 1, where the PMC is located. This is particularly advantageous if Site 1 is distant from the other sites, and data transfer primarily occurs in those locations.
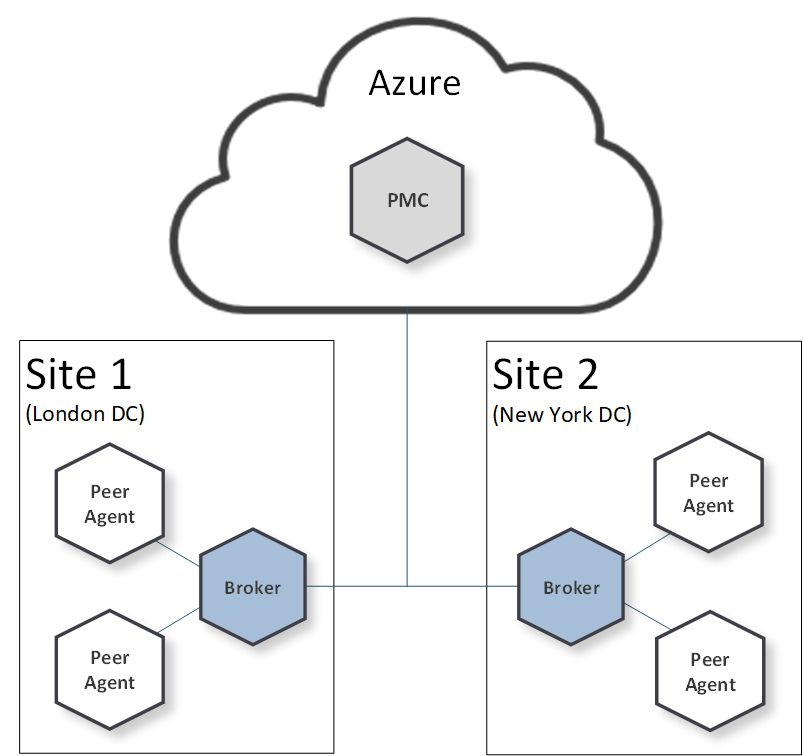
Example 3: Multi-Site Deployment with Cloud Integration
In this example, there are two sites (Sites 1 and 2), each with a broker, and the PMC is situated in the cloud. The advantage of this configuration is that having a broker on each site keeps the data local, facilitating more direct transfers between Agents. Additionally, placing the PMC in the cloud ensures a resilient location, with no replication data traffic passing through it.
Example 4: Active-Passive Setup to Facilitate PMC Failover
In this topology, there are two PMCs: Site 1 (London) is active, and Site 2 (New York) is passive. Even though the PMC on Site 2 is passive, the broker within the PMC installation on Site 2 remains active, allowing the Agents on Site 2 to communicate effectively via the closest broker. In a failover situation, the PMC situated at Site 1 switches over to the PMC located at Site 2, and the Agents on Site 1 failover to the broker on Site 2.
Note: To implement this, begin by deploying the second PMC as a site broker using the steps outlined below in the Configuring a Network of Brokers section. After setting up the network, follow the instructions provided in the Achieving high availability for the PMC through active-passive configuration article to establish the failover environment.
Viewing the Broker Network Using the Topology Perspective
The Topology perspective in the PMC gives customers the ability to view and configure sites and brokers from a single view in the PMC, allowing customers to create paths for Agents to communicate more directly with one another. Using the Topology perspective, you can:
-
Configure brokers and the network connections between them, including failover.
-
See all deployed brokers and their statuses.
-
View connected Agents and the broker that they are configured to use.
Accessing the Topology Perspective
To open the Topology perspective:
-
Open the PMC.
-
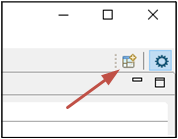
Click the Open Perspective icon in the upper right corner of the PMC.
-
In the Open Perspective dialog, select Topology and click Open.
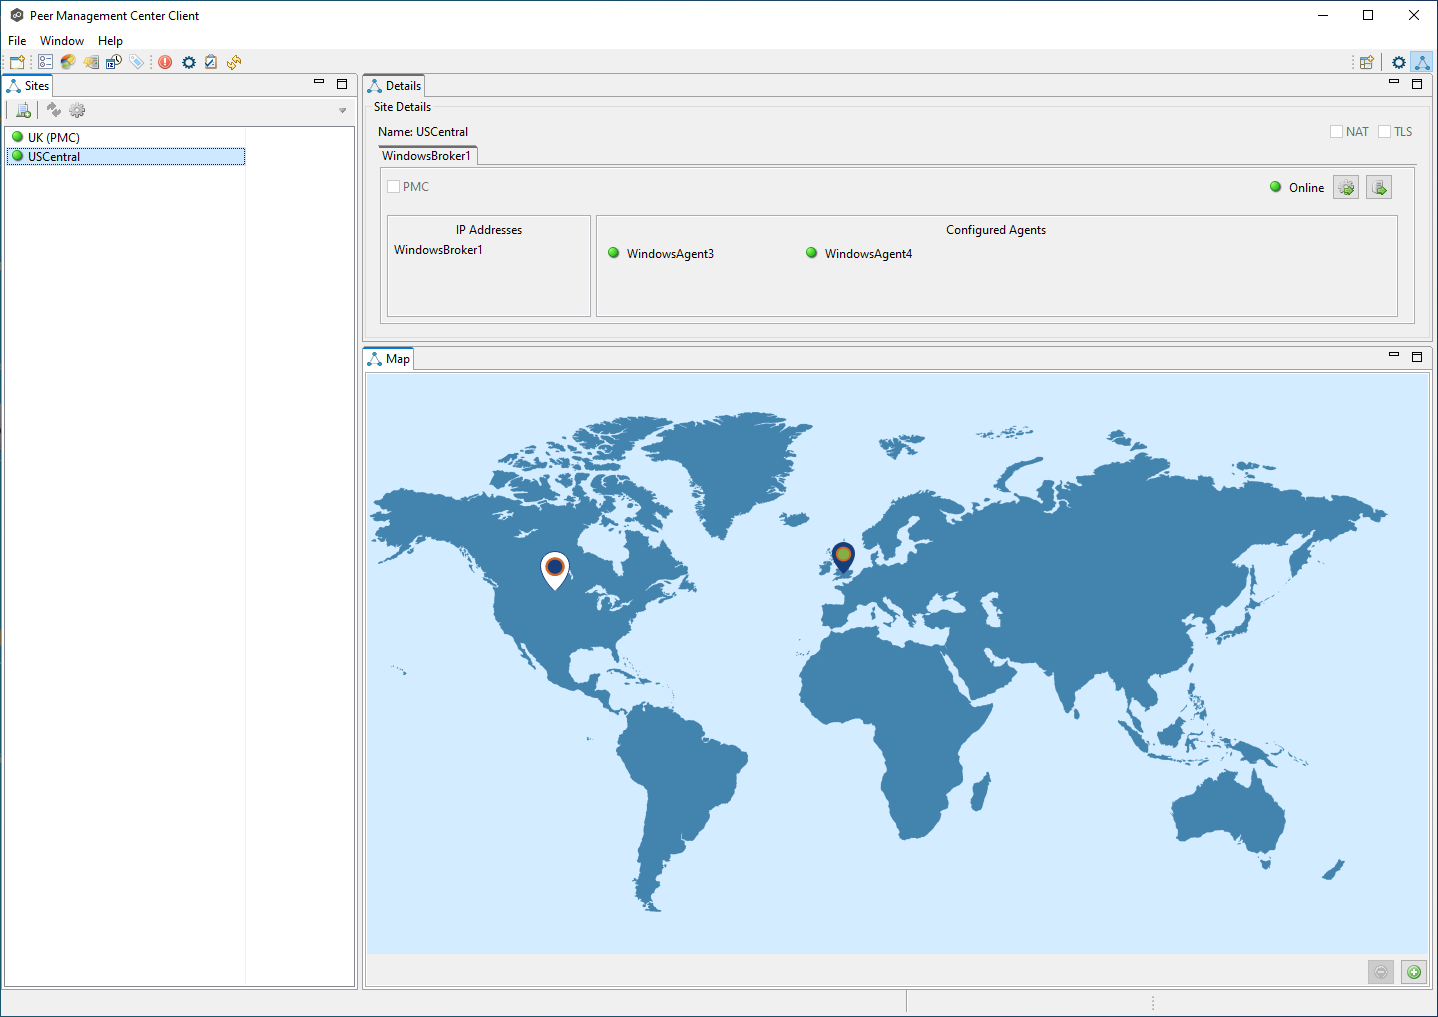
The Topology perspective appears. The black icon on the map represents where the PMC is located; white icons indicate where brokers are located.
-
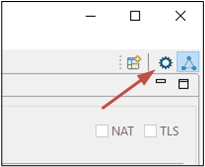
To return to the primary Jobs perspective, click the Jobs icon in the upper right corner of the PMC.
Configuring a Network of Brokers
To effectively set up and manage a network of brokers, perform these tasks:
Task 1: Install the brokers.
Task 2: Configure sites through the topology perspective.
Task 3: Connect the Agents to the proper broker.
Task 1: Installing the Brokers
After deciding where to deploy additional brokers in the PeerGFS environment, the first task is to install the broker software onto the desired servers. There are various deployment options, including on a Windows server, a Linux host, deploying virtual appliances or via AWS/Azure marketplace.
Before continuing to Task 2, ensure that all brokers have been installed or deployed. Once complete, no further steps are required on the broker machine itself.
Note: If a passive PMC is being installed, this will be one of the brokers in the PeerGFS topology. No configuration is required after the PMC installation as this will happen from the active PMC
To install a broker, follow these steps:
For Windows:
Click to expand...
-
Download and run the installer.
-
When the installation wizard opens, click Next.
-
Read and accept the license agreement.
-
Confirm the location of the installation directory.
-
Confirm the location of the Start Menu folder.
-
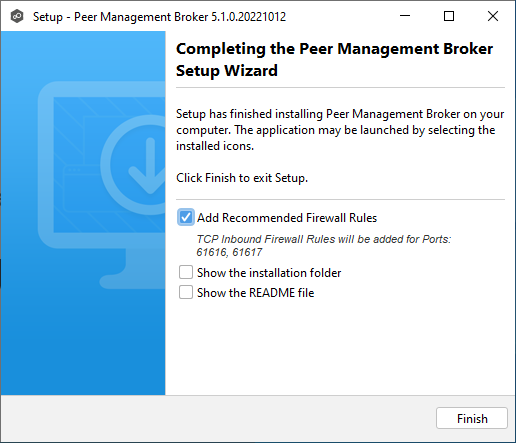
Finish the installation. If this is a new installation, add the recommended firewall rules if needed.
All brokers connect to each other on TCP ports 61616 (TCP) or 61617 (TLS); therefore access to these ports is required.
Once the broker has been installed, you are ready to configure the new site.
For Linux:
Task 2: Configuring Sites through the Topology Perspective
In this task, you will set up and organize sites within your broker network by utilizing the Topology perspective.
The steps below outline how to create logical sites and configure the brokers that have been installed in these sites. Once added, brokers will automatically be configured and incorporated into the environment.
For best practice, ensure that all sites are created and fully configured before proceeding to the next task.
To configure a new site:
-
Open the PMC.
-
From the Topology perspective, click the Add Site button.
The Add Site wizard opens.
-
Name the site, drag the icon to the desired location on the topology map, and then click Next.
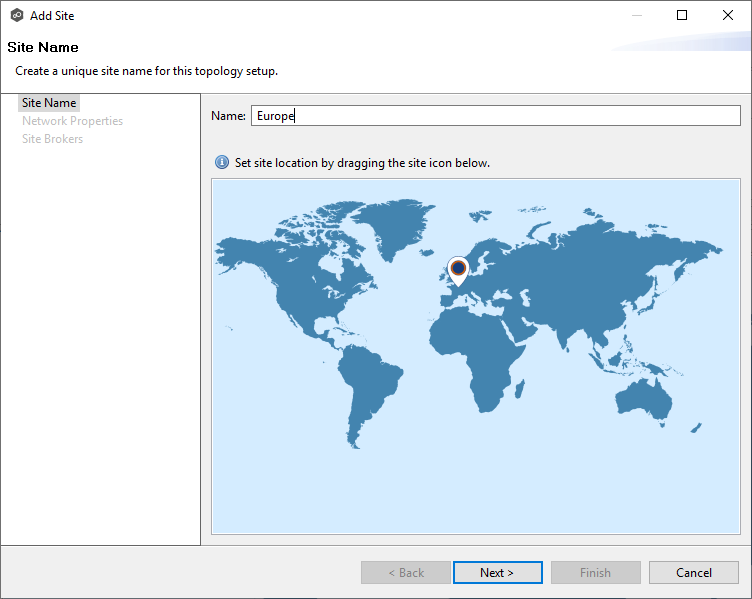
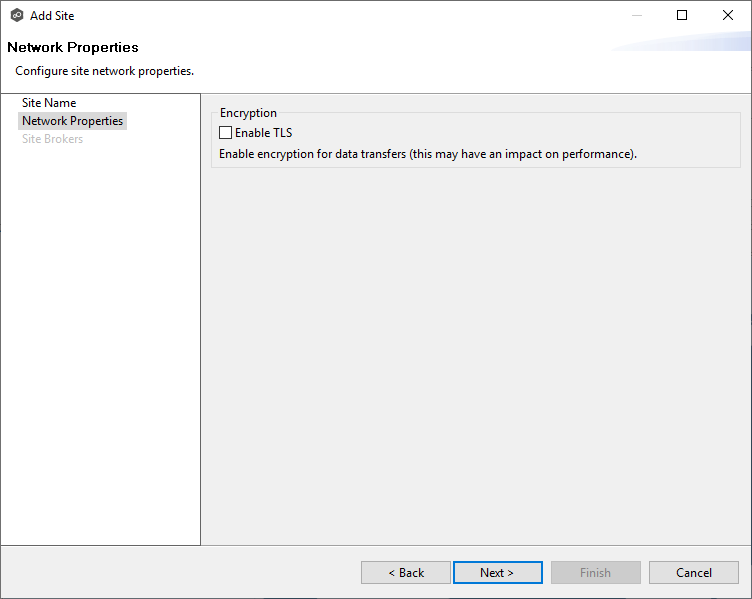
The Network Properties page appears.
-
Configure the general network setting for this site. Enabling TLS will encrypt all broker connections to and from this site.
-
Click Next.
The Site Brokers page appears. -
Configure the brokers for this site:
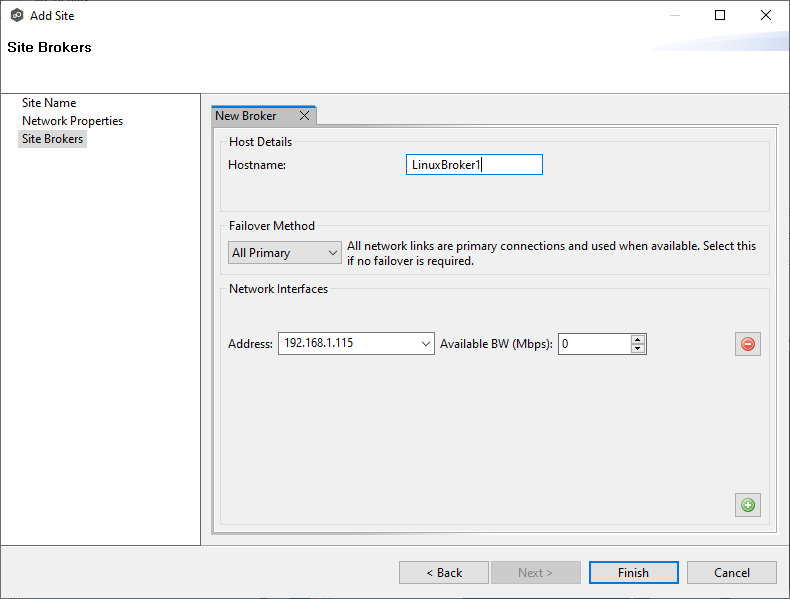
-
Enter a host name in the Hostname field.
-
Select a failover method. When a broker is configured with multiple IP addresses, there are three failover methods that can be utilized:
-
All Primary - All network links are used.
-
Active/Passive - All link have equal priority, but only one will be used at any given time.
-
Primary/Backup - Primary links will be used as a priority, backup links are used only when no primary links are connected.
-
-
Enter the network links for each broker. The IP address are for broker connections only and will not affect Agent connectivity to the broker. When a broker has multiple addresses, multiple links can be created.
-
(Optional) Enter an available bandwidth. The available bandwidth is not required, but when supplied, connections between this broker and other brokers will be optimized to try to achieve this performance.
Note: Make sure that network routing policies are correct for the desired behavior. PeerGFS has no control over this; please contact you network administrator for assistance.
-
-
Click Finish.
-
Click OK in the Add Site dialog to continue adding more sites, and then repeat Steps 2-6.
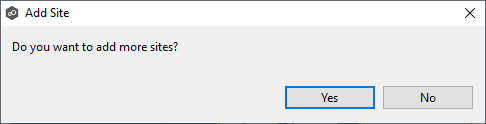
-
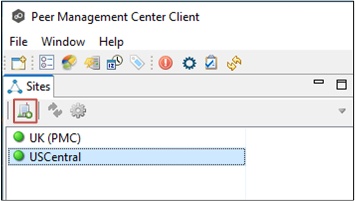
Once you have added all of the sites, the new offline site will be listed in the Sites view. Then, after a few seconds, the site will automatically come online.

Note: If the new site does not come online, see the Troubleshooting section below.
Task 3: Configuring Agent-Broker Connections
After creating additional sites and brokers within the PeerGFS topology, you need to reconfigure existing Agent connections to point to the new brokers.
To connect an Agent to a different broker:
-
Open the Jobs perspective in the PMC client.
-
Select all the Agents to reconfigure and then select Edit Agent Configuration on Selected Agents.
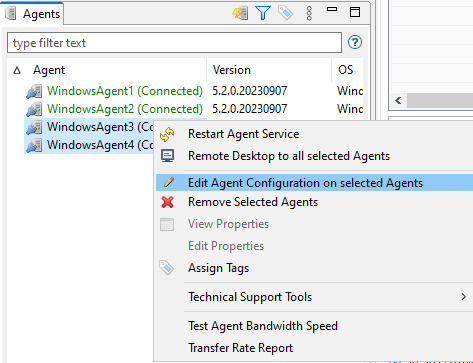
The Broker Configuration dialog appears.
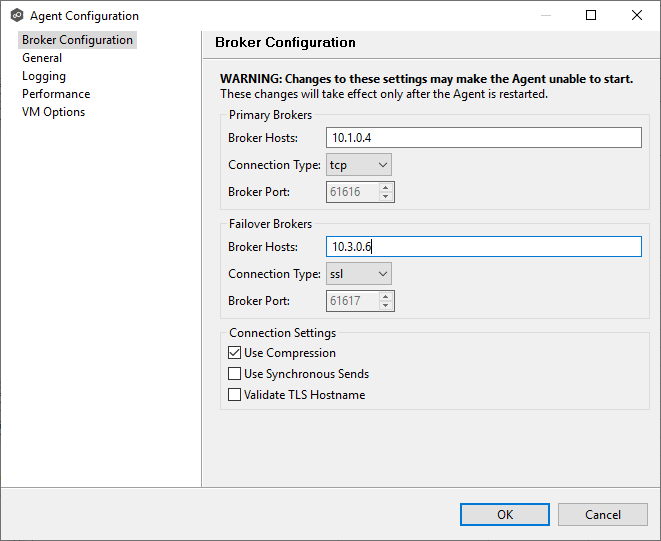
-
In the Primary Brokers section, enter the newly added broker IP address or DNS name in the Broker Hosts field.
-
In the Failover Brokers section, add the IP address or DNS of the PMC server in the Broker Hosts field.
-
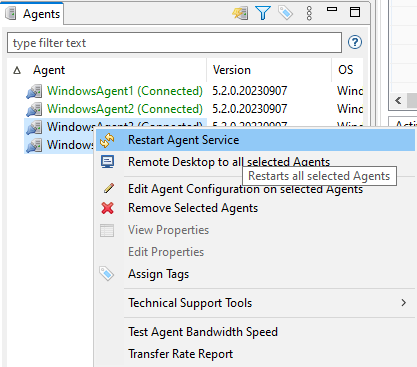
Restart the modified Agents by selecting all of the modified ones in the Agents view, right-clicking, and then selecting Restart Agent Service
Viewing Connected Agents
Now that you've configured your sites, you can view your Agents and their connections to brokers. When a broker is online, Agents configured to connect to it are displayed in the Details view in the Topology perspective.
To view the Agents connected to a broker:
-
Select a site in the Sites view.
Agents connected to that broker appear in the Configured Agents section of the Details view.Note that the failover status of an Agent is not displayed.

Troubleshooting
Offline Agents
When addressing issues with offline Agents, you need to verify the network and broker configurations.
Follow these guidelines to troubleshoot and resolve issues with offline Agents:
-
Ensure that the broker IP address on the Agent corresponds to an accessible broker. Note that this adress does not need to match the broker's configuration.
-
Check that the primary broker is online.
-
Check that the broker firewall has TCP port 61616/61617 open to accept network connections.
-
For incorrect IP address entries in the Agent configuration, it may be necessary to alter the jms.broker.hostname entry in the Agent.properties file within the Agent installation directory.
Offline Brokers
When dealing with offline brokers, there are several key steps to ensure the broker can accept remote configurations and operate effectively within the network.
Follow these guidelines to troubleshoot and configure offline brokers:
-
Check that the broker firewall has TCP port 61616/61617 open to accept network connections.
-
Ensure that the site networking allows remote access to the broker machine on TCP port 61616/61617.
-
Check that the configured network addresses of the broker are accessible from the PMC.
-
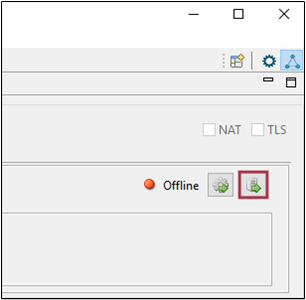
If a NAT is in use, ensure that public IP addresses are configured for the broker and that port forwarding rules have been applied correctly.
-
Check that the hostname is correct (case insensitive).
-
Check the network access is available between machines (see Using the PortCheck Utility to troubleshooting connectivity issues).
Connections Cannot be Made to the Remote BrokerBroker Behind a Firewall
Although it is not recommended, a broker can be deployed behind a firewall with connections limited to the PMC. In this case, you will need to manually transfer the vconfiguration from the PMC to the broker.
To manually download the configuration file and copy it to the broker host:
-
Click the Download Configuration button and save the .xml file.
-
Copy the saved file to the broker host in the directory <BrokerInstallLocation>/Topology/client-update.xml.
The XML file should disappear after a few second, as the new broker configuration is applied.