
Excerpt - Troubleshooting
Error 1053 When Starting CAVA Service
If you get Error 1053 when you try to start the EMC CAVA service, ensure that the .NET 3.5 Framework is installed on the CEE server, and then restart the EMC CAVA service on the CEE server.
Starting RabbitMQ Issue
If you experience an issue with starting RabbitMQ, try the following steps:
- On the CEE server, open a command prompt as an administrator.
- Navigate to the directory where RabbitMQ Server is installed (typically C:\Program\Files\RabbitMQ Server\rabbitmq_server-X.X.X\bin, where X.X.X is the version number).
Enter the following three commands:
rabbitmq-service stop
rabbitmq-service remove
rabbitmq-server start
If the start command results in an error about an Erlang cookie, reset the HOMEDRIVE and HOMEPATH environment variables to a locally accessible folder (such as C:\Users\Public). To set these environment variables:
Open a command prompt as an administrator.
When prompted to allow changes, click Yes.
Enter the following commands in the command prompt window:
set HOMEDRIVE=C:
set HOMEPATH=/Users/Public
Rerun the following command and verify that no Erlang cookie errors are encountered:
rabbitmq-service start- Use Ctrl+C to stop the RabbitMQ Server process.
- Delete the folder C:\Users\%Username%\AppData\Roaming\RabbitMQ.
Enter the following commands in the command prompt window:
rabbitmq-service install
rabbitmq-service start- Verify that the folder C:\Users\%Username%\AppData\Roaming\ was recreated and populated with db and log folders.
Error 0x800F0954 When Installing .NET Framework 3.5
When installing .NET 3.5 on Windows Server 2019, the following error may appear:
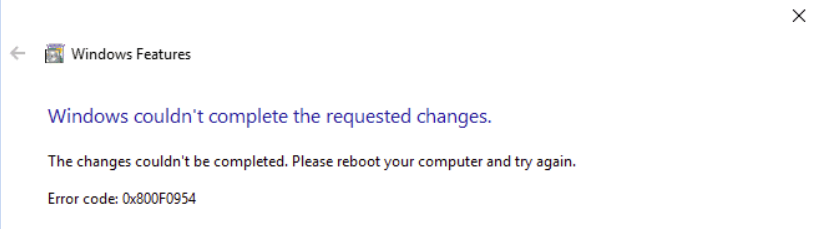
The error 0x800f0954 refers to CBS_E_INVALID_WINDOWS_UPDATE_COUNT_WSUS, which indicates that your system may have been configured to use a WSUS server (on your domain network) to get updates instead of connecting to Windows Update servers directly.
You need to reinstall the .NET package from a Server 2019 installation disk by following these steps:
- Attach the Windows Server 2019 installation disk to the server.
Run the following command in an elevated command prompt.
dism /online /enable-feature /featurename:NetFX3 /Source:H:\sources\sxs /LimitAccesswhere H:\ represents the drive letter of the attached Windows Server 2019 installation disk.