

Purpose of this Guide
This guide explains how to configure PeerGFS to use PostgreSQL as an external database engine for storing watch set details. It assumes general familiarity with using PeerGFS and experience administering a PostgreSQL. The guide focuses specifically on PostgreSQL integration with PeerGFS and does not cover the broader capabilities of PeerGFS. For general configuration and usage of PeerGFS, refer to the PeerGFS User Guide for your installed version.
If you are not familiar with administering PeerGFS, please consult your Peer Software point of contact before proceeding.
Support for PostgreSQL integration was introduced in PeerGFS v6.2 and is available to customers with Enterprise or Data Center subscription licenses.
Introduction to PostgreSQL
PeerGFS stores details about all files and folders within a job’s watch set in a database. By default, this database lives within the Peer Management Center Service (PMC Service). While the database inside the PMC Service can support up to one billion files in a single job’s watch set, performance at that scale can be suboptimal. To support larger and more demanding environments, PeerGFS can now offload the storage of watch set details to an external PostgreSQL database, significantly improving scalability and performance.
PostgreSQL is a mature, scalable, and high-performance open-source database engine known for its reliability and high performance. In internal testing, PeerGFS has scaled successfully with PostgreSQL in environments containing up to 25 billion files within a single job’s watch set.
When to Use PostgreSQL with PeerGFS
We strongly recommend using PostgreSQL in any of the following scenarios:
-
A single job has a watch set exceeding 100 million files.
-
The total file count across all jobs within a PMC exceeds 500 million files.
-
You anticipate significant future growth in the number of files monitored.
Using PostgreSQL in these cases helps maintain responsiveness, stability, and performance during database-intensive operations such scanning watch sets and handling high volumes of real-time changes.
Learn More About PostgreSQL
PostgreSQL is developed and maintained by a global open-source community. For more information about its features, history, and ecosystem, visit the official PostgreSQL website.
Next Steps
This guide will walk you through:
-
The system requirements and prerequisites for using PostgreSQL with PeerGFS
-
Installing and setting up a PostgreSQL instance
-
Configuring PeerGFS to integrate with PostgreSQL
Requirements
Before configuring PeerGFS to use PostgreSQL, ensure the following requirements are met:
1. PostgreSQL Installation
-
A supported version of PostgreSQL must be installed and running in your environment. As a mature database technology, PostgreSQL has gone through many iterations and has supported and unsupported versions. As of January 2025, PeerGFS has been validated with PostgreSQL versions 14, 16, and 17. While installation and tuning steps may vary by version, the configuration within PeerGFS remains consistent.
-
The PostgreSQL server must be reachable from the system running the Peer Management Center Service (PMC Service). You may install PostgreSQL directly on the PMC server or on a separate server. This guide assumes that PostgreSQL is installed on the PMC server. In this case, we recommend allocating at least 2 additional CPU cores and 8 to 16 GB of additional physical memory to support PostgreSQL operations.c
-
Storage requirements depend on the number of files and folders in your environment and the length of their names. As a general guideline, allocate at least 300 GB of storage per billion files. To ensure optimal performance, store the database on fast, reliable storage—preferably an SSD or RAID array.
-
For production environments, we strongly recommend using a dedicated PostgreSQL instance for PeerGFS..
PeerGFS does not install or manage PostgreSQL. You are responsible for setting up, maintaining, and securing the database instance.
2. User and Database Setup
-
A PostgreSQL user account must be created with sufficient privileges to:
-
Create schemas
-
Create and manage tables
-
Perform read/write operations
-
-
A dedicated database should be created for PeerGFS. This keeps data isolated and simplifies performance tuning and backups.
3. Network Connectivity
-
The machine running the PMC Service must have network access to the PostgreSQL server over the configured port (typically 5432).
-
Firewalls and access control lists must allow communication between PeerGFS and the database.
4. PeerGFS Version
-
You must be running PeerGFS v6.2 or later, as PostgreSQL support is not available in earlier versions.
-
Your license must include Enterprise or Data Center subscription entitlements.
Setting Up PostgreSQL for PeerGFS Integration
The steps in Tasks 1 and 2 are provided as examples only. You are responsible for deploying, configuring, securing, and maintaining your PostgreSQL instance according to your organization’s requirements and best practices.
This section outlines the steps for setting up PostgreSQL to integrate with PeerGFS. The process is divided into three tasks:
-
Task 1. Installing PostgreSQL,
-
Task 2. Tuning PostgreSQL for optimal performance, and
-
Task 3. Configuring PeerGFS to use PostgreSQL as its external metadata store.
Task 1. Downloading and Installing PostgreSQL
The installation process for PostgreSQL varies depending on your platform. Follow the appropriate steps below for Windows, Ubuntu, or Red Hat Enterprise/Rocky Linux.
Installing PostgreSQL on a Windows Server
Click to expand...
-
Download the appropriate Windows installer
.exe. These installers are not maintained by Peer Software and can be found on the official PostgreSQL download page. -
Run the installer.
-
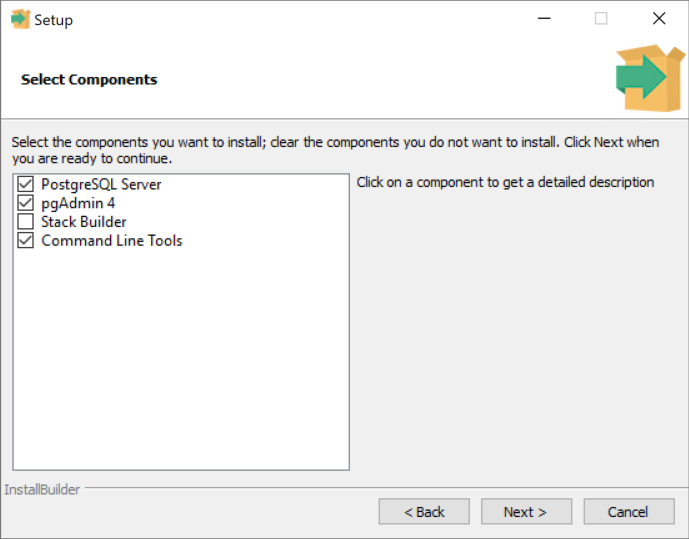
When prompted to select components, make sure to include PostgreSQL Server and Command Line Tools. If you prefer a graphical interface for administration, you may also choose to install pgAdmin 4.
-
When prompted to choose a data directory, we strongly recommend selecting a location on a fast drive or RAID array with sufficient storage. For guidance on expected usage, see the Requirements section above.

-
When prompted to enter a password, specify a secure password. You’ll need this password in Task 3 when configuring PeerGFS to connect to the database.
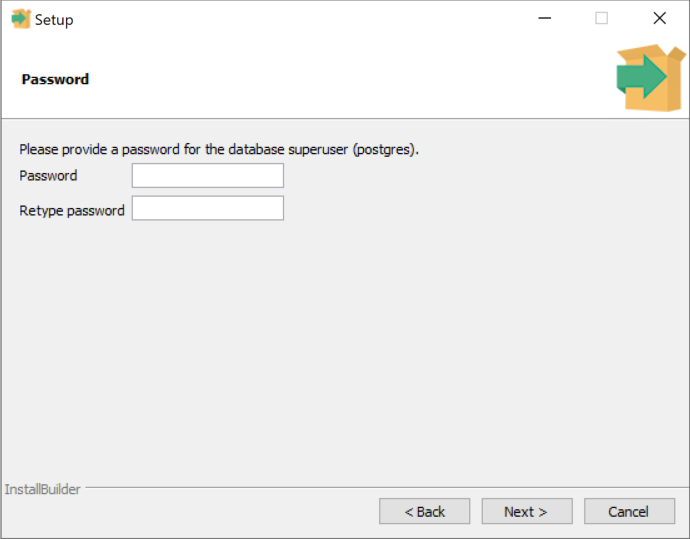
If you use the default postgres user and set its password to postgres, you will not need to specify credentials in the fc.ini file during Task 3.
-
When prompted for a port, the default is
5432. If you select a different port, be sure to account for it in Task 3.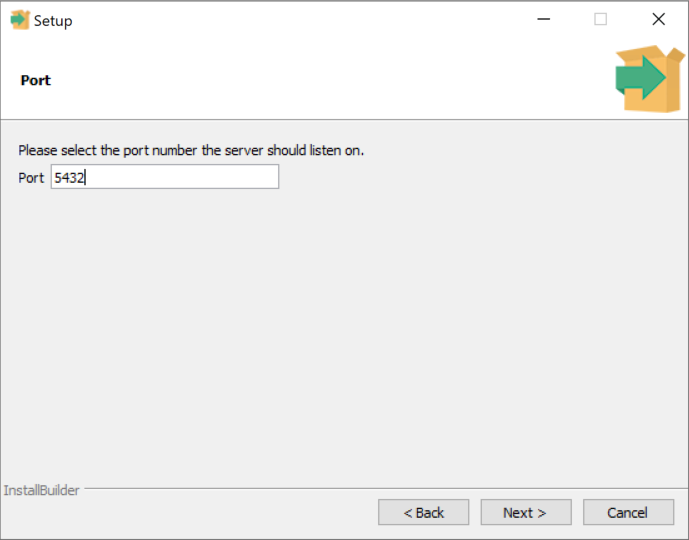
-
Leave the remaining options at their defaults and complete the installation.
Installing PostgreSQL on a Ubuntu server
Installing PostgreSQL on a Red Hat Enterprise or Rocky Linux Server
Task 2. Tuning PostgreSQL
This task focuses on tuning PostgreSQL for optimal performance in a PeerGFS environment. This includes adjusting memory settings, preventing automatic upgrades, and relocating the PostgreSQL data folder if necessary. Follow the steps below to ensure PostgreSQL is configured for maximum efficiency.
Memory Tuning
The primary PostgreSQL configuration file can be found at:
-
Windows:
<POSTGRES DATA FOLDER>\postgresql.conf -
Linux:
/etc/postgresql/*/main/postgresql.conf
Based on performance testing, we recommend adjusting the following memory parameters within the postgresql.conf file:
maintenance_work_mem = 1GB
shared_buffers = 4GB
work_mem = 256MB
-
maintenance_work_mem: Set to 1GB to allocate sufficient memory for maintenance operations like VACUUM, CREATE INDEX, and ALTER TABLE. -
shared_buffers: Set to 4GB or approximately 25% of the available physical memory on the PostgreSQL server. This helps PostgreSQL manage memory efficiently for caching and other tasks. Adjust this value based on your server’s total RAM. For example, if the server has 16GB of RAM, setshared_buffersto 4GB. -
work_mem: Set to 256MB to optimize memory usage for internal operations like sorting and joins.
After making these changes, restart the PostgreSQL service for the settings to take effect.
-
Windows: The service name will start with
postgresql-x64-, followed by the major version number installed. -
Linux: Run the following command to restart PostgreSQL:
sudo systemctl restart postgresql
More details on these options can be found in the PostgreSQL documentation.
Preventing Automatic Upgrades on Linux Platforms
If you installed PostgreSQL using apt or an equivalent package manager, we recommend turning off automatic upgrades to prevent unexpected database outages.
To prevent automatic PostgreSQL upgrades on Ubuntu, follow these steps:
-
Open the configuration file:
sudo nano /etc/apt/apt.conf.d/50unattended-upgrades
-
Add the following line under the section
Unattended-Upgrade::Package-Blacklist:
"postgresql-.*";
For more details on preventing PostgreSQL restarts via automatic updates, see these resources:
Relocating the PostgreSQL Data Folder to a Different Volume
If you need to relocate the PostgreSQL data folder to another volume, follow the appropriate steps below for your operating system.
Moving the Data Folder on a Windows PostgreSQL Server
Moving the Data Folder on a Linux PostgreSQL Server
Task 3. Configuring PeerGFS to use PostgreSQL
Perform these steps to configure PeerGFS to use PostgreSQL as its external metadata store.
If you attempt to set PeerGFS to work with PostgreSQL but are not licensed for PostgreSQL integration, the PMC will ignore the PostgreSQL configuration and continue to use its built-in database
If you need to install an updated license to enable PostgreSQL support, we suggest doing so before following the steps below. If you have already completed the steps below, you will need to install the license via the PMC client and then restart the Peer Management Center Service for the database configuration to take effect.
-
Stop All Running Jobs and Services
-
Use the PMC client to stop any running jobs.
-
Open the console to the PMC server or connect to it via RDP/SSH.
-
Stop the following services:
-
Peer Management API Service
-
Peer Management Center Web Service
-
Peer Management Center Service
-
If the PMC is installed on a Linux server, you can run the following commands:
sudo systemctl stop PMC-API-Service.service sudo systemctl stop PL-Hub-Web-Service.service sudo systemctl stop PL-Hub-Service.service -
-
Edit
fc.iniConfiguration File-
Go to the Hub/workspace folder within the Peer Management Center installation directory:
-
Default installation directory for Windows:
C:\Program Files\Peer Software\Peer Management Center -
Default installation directory for Linux:
/opt/peersoftware/peer-management-center
-
-
Create (or edit if the file already exists) a file named
fc.iniand add the following lines:fc.fileinfo.db.usePostgresDB=true fc.fileinfo.db.external.username= fc.fileinfo.db.external.password=-
Set
fc.fileinfo.db.external.usernameto a database superuser (usuallypostgresby default). -
Set
fc.fileinfo.db.external.passwordto the password for this user (the password entered during PostgreSQL installation in Task 1).
-
-
-
Optional: Configure External PostgreSQL Server (if applicable)
-
If your PostgreSQL service resides on a different server or uses a non-standard port, add the following lines to the
fc.inifile:fc.fileinfo.db.external.host=localhost fc.fileinfo.db.external.port=-
Set
fc.fileinfo.db.external.hostto the fully qualified domain name (FQDN) or IP address of the PostgreSQL server. -
Set
fc.fileinfo.db.external.portto the appropriate port.
-
-
-
Restart PMC Services
-
Start the following services:
-
Peer Management API Service
-
Peer Management Center Web Service
-
Peer Management Center Service
-
If the PMC is installed on a Linux server, you can run the following commands:
sudo systemctl start PL-Hub-Service.service sudo systemctl start PL-Hub-Web-Service.service sudo systemctl start PMC-API-Service.service -
-
Verify PostgreSQL Integration
-
Go to the Hub/workspace/logs folder within the Peer Management Center installation directory:
-
Default installation directory for Windows:
C:\Program Files\Peer Software\Peer Management Center -
Default installation directory for Linux:
/opt/peersoftware/peer-management-center
-
-
Open
fc.logand search for the following log entry:@@@@@@@@@@@@ File Info PostgreSQL database Enabled...initializing service
-
-
Reopen PMC Client and Restart Jobs
-
You may now reopen the PMC client and restart your jobs. Please note that offline delete and rename detection will be disabled during the first scan of each job after switching over to PostgreSQL.
-
Troubleshooting PostgreSQL Integration with PeerGFS
If you encounter issues after configuring PostgreSQL for PeerGFS, start with the following troubleshooting steps to identify and resolve common problems. If issues persist, further investigation may be required—such as reviewing server logs or consulting a PostgreSQL expert.
1. PMC Client Won’t Load After Setting PostgreSQL Configuration
2. Peer Management Center Service Not Starting After PostgreSQL Configuration
3. PostgreSQL Service Fails to Start