
This article explains how to maximize network utilization with PeerGFS when many files are being transferred and the network capabilities is unknown. It is not appropriate to use the approach described in this article for single file transfers, when maximum network throughput is already being reached or when storage infrastructure is being saturated.
Overview
Task 1. Install the Performance Utilities
Task 2. Analyze maximum network capabilities
Task 3. Update the PMC/Broker Server configuration
Task 4. Update the Agent configuration
Task 1. Install the Performance Utilities
Peer Software Performance Utilities contains tools that will help the user test an environment to find bottlenecks and help to reach its full potential. You will be using a tool called getperf, which assesses the network capabilities and then outputs configuration changes to make that will best fit the given network environment. If you are using PeerGFS v4.7.0 or later, then the tool is already installed on the PMC and Agent servers, and thus this task does not have to be performed. For older releases, follow these steps to install the tool:
Step 1. Download Peer Software Performance Utilities: https://downloads.peersoftware.com/internal/PerformanceUtilities_win64_v2.1.exe
Step 2. Install the software on the PMC server.
Step 3. Install the software on the Agent server(s).
Task 2. Analyze maximum network capabilities
This task focuses on diagnosing the capabilities of the network link between an Agent and the nearest Broker (usually on the PMC server). After this task is performed, if the determined throughput is not what is expected, then it is important that the network issue(s) are resolved before performing any configuration changes.
Step 1. On the PMC server, open a command prompt and navigate to the Peer Software installation subfolder where the tool is installed:
-
v4.7.0 or later - the tools folder
-
v4.6.1 or earlier - the Performance Utilities folder
Step 2. Run the following command:
getperf.exe --hub --port 9999
-
Where port can be any unused, non-privileged TCP port that has network connectivity between the Agent and PMC/Broker. If you are running any Peer Management services while performing this task, then avoid using TCP ports 61616 and 61617.
Expected output:
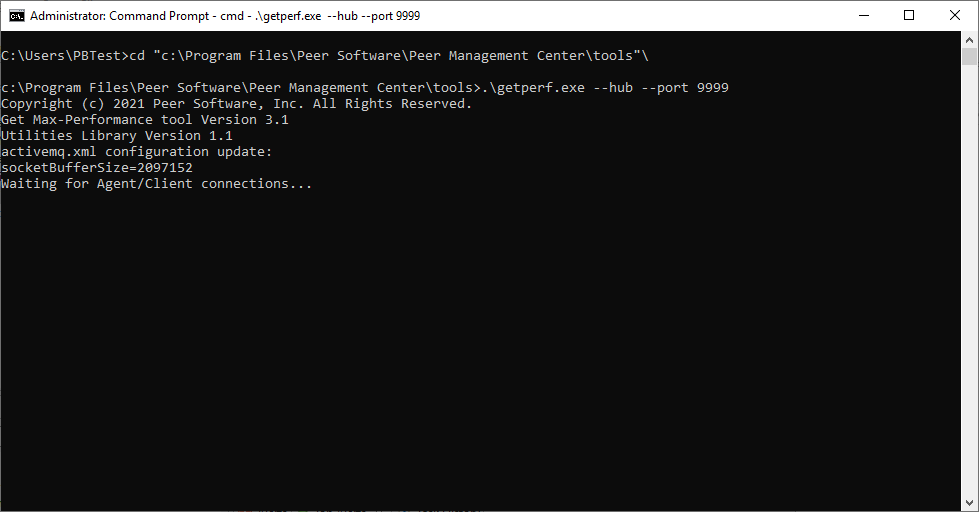
Step 3. Leave this running
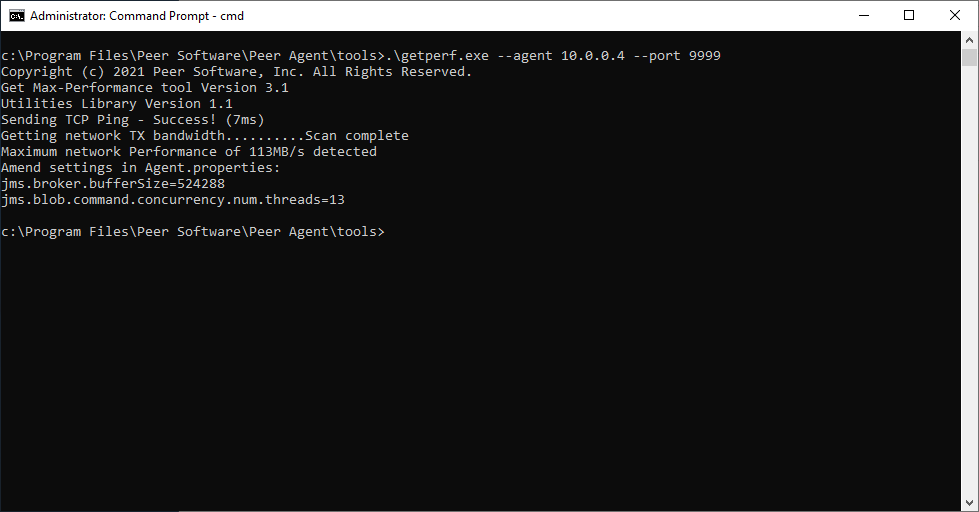
Step 4. On an Agent server, open a command prompt and navigate to the Peer Software installation subfolder where the tool is installed:
-
v4.7.0 or later - the tools folder
-
v4.6.1 or earlier - the Performance Utilities folder
Step 5. Run the following command:
getperf.exe --agent <PMC IP> --port 9999
-
Where PMC IP is the IPv4 address of the PMC/Broker that the Agent has access to.
-
The port argument must match the one run on the PMC server.
This process can take several minutes and will saturate the network link between the Agent and PMC.
Expected output:
Step 5. Repeat the process on all Agent servers requiring network analysis.
Step 6. When all Agents have been completed, terminate the getperf command running on the PMC server.
Step 7. Make sure that the detected performance is as expected. A history of tests run and their results can be retrieved from the getperf.csv file found in the directory that the test was run from. If the detected output is less than what is expected, then consult the site administrator or network engineer to resolve any infrastructure issues.
Task 3. Update the PMC/Broker Server configuration
Step 1. Navigate to <PMC Installation Directory>\Broker\conf in Windows Explorer on the PMC server;
Step 2. Locate the activemq.xml file.
Step 3. Using the output from the command run on the PMC/Broker server in Task 2, edit the activemq.xml file, modifying or adding the following values shown in bold:
<transportConnectors>
<!-- DOS protection, limit concurrent connections to 1000 and frame size to 100MB →
<transportConnector name="ssl" uri="ssl://0.0.0.0:61617?socketBufferSize=2097152&maximumConnections=1000&wireformat.maxFrameSize=104857600"/>
<transportConnector name="nio" uri="nio://0.0.0.0:61616?socketBufferSize=2097152&maximumConnections=1000&wireformat.maxFrameSize=104857600"/>
</transportConnectors>
Step 4. Restart the PMC and Broker services.
Task 4. Update the Agent configuration
Step 1. Navigate to <Peer Agent Installation Directory> in Windows Explorer on the Agent server; locate the Agent.properties file.
Step 2. Using the output from the command run on the Agent server in Task 3, update the Agent.properties file with the following modifications shown in bold:
jms.broker.syncSends=false
jms.broker.bufferSize=2097152
jms.blob.command.concurrency.num.threads=45
Step 3. Restart the Agent service.
Related articles
Page: Achieving high availability for the PMC through active-passive configuration Page: Achieving high availability for the PMC through active-passive configuration (v4.7.0 - v5.1.1) Page: Achieving high availability for the PMC through active-passive configuration (v5.2 only) Page: Achieving high availability for the PMC through active-passive configuration (v6.0 and later) Page: Firewall Requirements Page: How does bandwidth throttling work? Page: Maximize network throughput Page: Move a Peer Agent to another Windows server Page: Peer Global File Service - Environmental Requirements Page: Throttle bandwidth between the Broker and a remote Agent