
Achieving high availability for the PMC through active-passive configuration (v4.7.0 - v5.1.1)
Note: This article applies to PeerGFS v4.7.0 thru v5.1.1. If you are using PeerGFS v5.2 or later, see Achieving high availability for the PMC through active-passive configuration (v5.2 and later).
Overview
This article describes how to achieve high availability for your PeerGFS environment by setting up an active-passive configuration. As of PeerGFS v4.7.0, you can configure Agents to failover from one PMC server to a backup PMC server.
With an active-passive configuration, you run a primary active PMC server (physical or virtual) with a second passive PMC server (physical or virtual) configured as a backup. When a failure occurs on the active PMC server, the passive PMC server is ready to take over the work of the active server. Once configured, no user interaction is required when failing over to or from the backup PMC other than starting the Peer services on the passive server. Jobs set to autostart will start automatically on the passive server.
Note: The PMC workspace folder (a subfolder in the PMC installation folder) on the passive server must be kept up-to-date so that it is ready to take over if the active server goes down. Although any third-party replication tool can be used to keep the PMC configuration on the passive server up-to-date, with PeerGFS v4.5.2 and later, the Task Scheduler includes a Back up PMC Configuration task that can be scheduled to regularly back up the configuration of the active server directly to the passive server. If you use a third-party replication tool, it will require VSS support to ensure it gets a clean snapshot of the PMC's configuration database.
Benefits
The benefits of an active-passive configuration include the absence of a need for additional hardware and software, except for provisioning a new physical or virtual server. Furthermore, it is a simpler and more cost-effective solution to implement across multiple locations, particularly for covering PMC disaster recovery scenarios.
Licensing
Since only one PMC server is active at a time, only one PeerGFS license is needed. You are allowed to use the same license on the primary and backup servers but only one server can be active at a time. Having both the active and backup servers active at the same time would require an additional PeerGFS license.
Prerequisites
- If you are using a network of brokers, set up the network before setting up active-passive configuration.
- Ensure that the identical version of PeerGFS is already installed on both the active and passive servers.
- License and set up one PMC to function as the active one while leaving the other PMC unlicensed and in an empty state.
- The active and passive servers must be belong to the same Windows Domain and share the same time zone.
Configuration Process Overview
Ideally, the active-passive configuration should be set up before configuring the first production job. As soon as PeerGFS jobs approach production readiness, it is advisable to create a backup of the PMC configuration, irrespective of whether a server is designated as a backup PMC device. Backing up the PMC configuration takes seconds and can save hours of job reconfiguration in case of a system failure.
Once you have backed up the PMC configuration, you are ready to set up the active-passive configuration. The setup consists of four tasks:
- Disable the Peer services on the passive server – All Peer services should be set to a manual start to ensure this server is in a passive/standby role while the primary server is active.
- Give the active server permission to write to the passive server – The active server needs permission to back up the PMC configuration to the passive server.
- Create a backup task on the active server – The backup task should regularly back up the PMC configuration on the active server to the PMC workspace folder on the passive (backup) PMC server.
- Configure Agents to failover to the passive server – Set up each Agent to automatically failover to the backup PMC when the primary is inaccessible, and failback to the original PMC when it is available again.
The next section, Configuration Tasks, provide step-by-step instructions for these four tasks. The Recovery section describes how to failover to the backup PMC server and then how to failback to the original PMC server.
Configuration Tasks
Task 1. Disable the Peer services on the passive server
This task is necessary to prevent Peer services running on the passive server while the active server is running.
- Login to the passive PMC server.
- Open the Windows Services application.
A total of five Peer Management services may be listed, depending on your installation.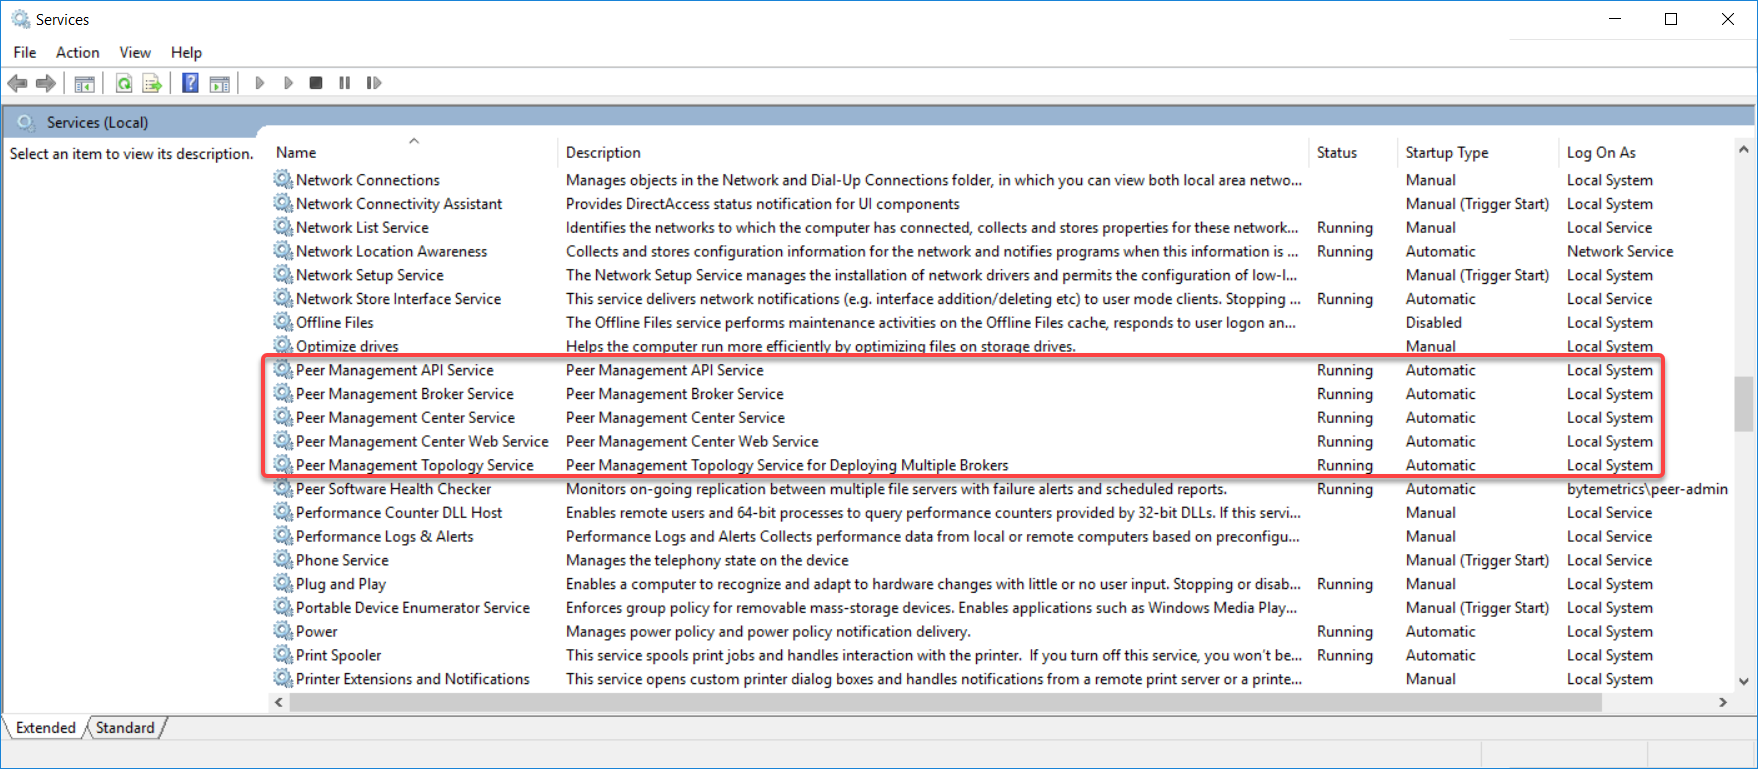
- Stop all the Peer Management services UNLESS you are using a network of brokers. If you are using a network of brokers, keep the Peer Management Broker Service and Peer Management Topology Service running.
- Edit the properties of each stopped service (do not edit services kept running for network of brokers):
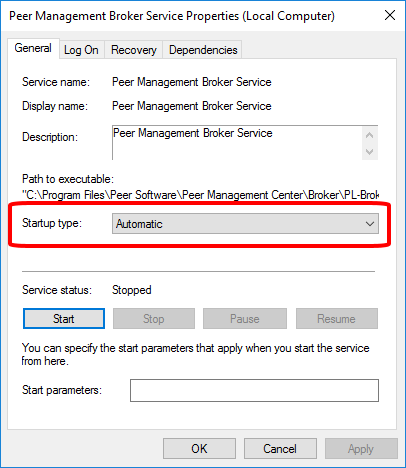
a. Change Startup type from Automatic to Manual.
b. Click OK to save the changes.
Task 2. Give the active server permission to write to the passive server
Before you can back up the active server's PMC configuration to the passive server, you must authorize the active server to write to the passive server.
To add the active server's computer account to the local Administrators group on the passive server:
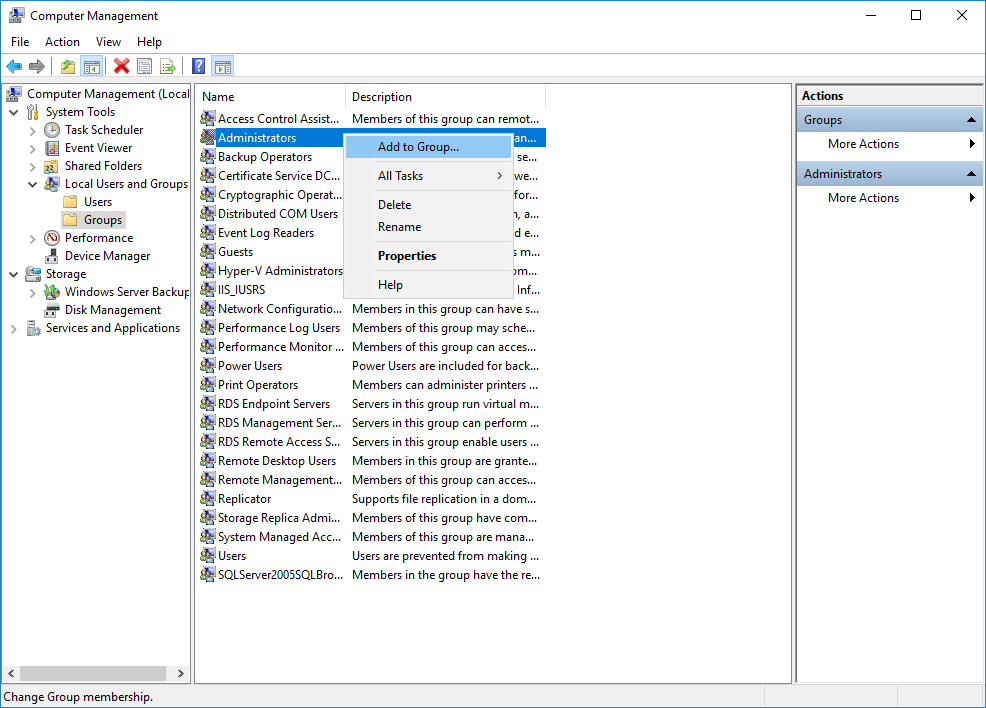
- Open the Windows Computer Management application.
- In the console tree, click Local Users and Groups, and then click Groups.
- Right-click the Administrators group, and then select Add to Group.
- In the Administrators Properties dialog, click Add.
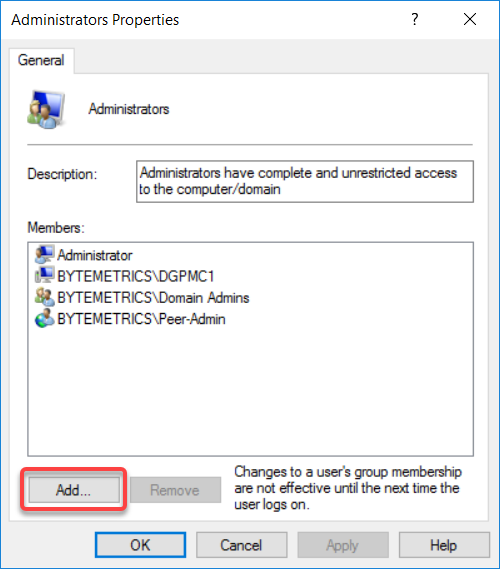
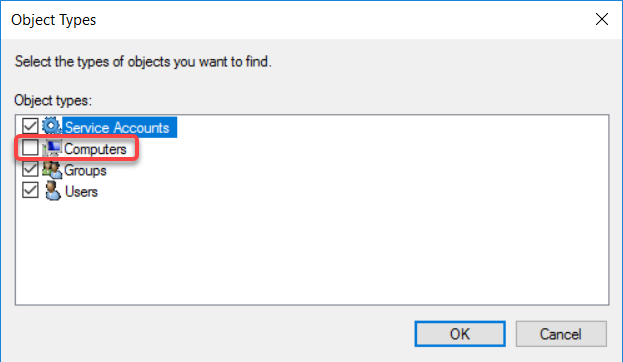
- In the Select Users, Computers, Service Accounts, or Groups dialog, click Object Types.
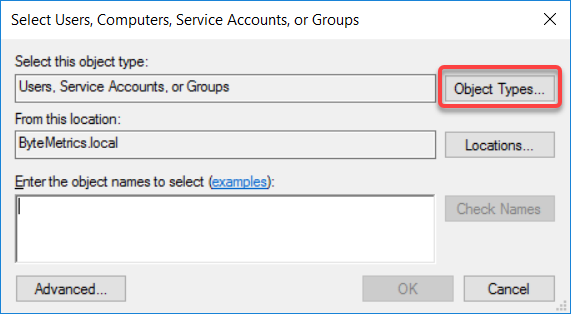
- In the Obect Types dialog, select the Computers checkbox, and then click OK.
- Type the name of the primary PMC server into the Enter the object names to select field.
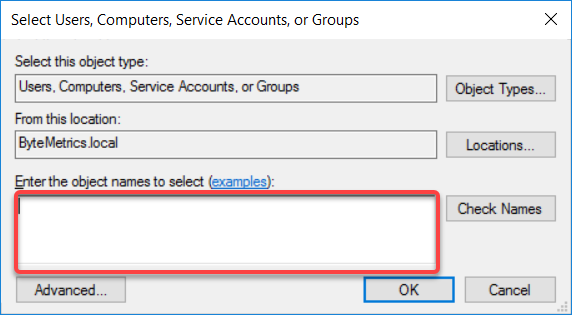
- Click Check Names to confirm the computer is found on the network.
- Click OK to add it as a member of the local Administrators group.
- Click OK to save the Group change.
- Close Computer Management.
- Log off from this server.
Task 3. Create a backup task on the active server
The backup task will back up the configuration of the active PMC server to the passive PMC server on scheduled basis.
- Log in to the active PMC server.
- Open the PMC.
- Select Preferences from the Window menu.
- Select Task Scheduler in the navigation tree.
Click the Create button.
Name the backup task (e.g., PMC Configuration Backup).
Select Peer Management Center from the Solution dropdown list.
Select Back up PMC Configuration for Job/Task Types.
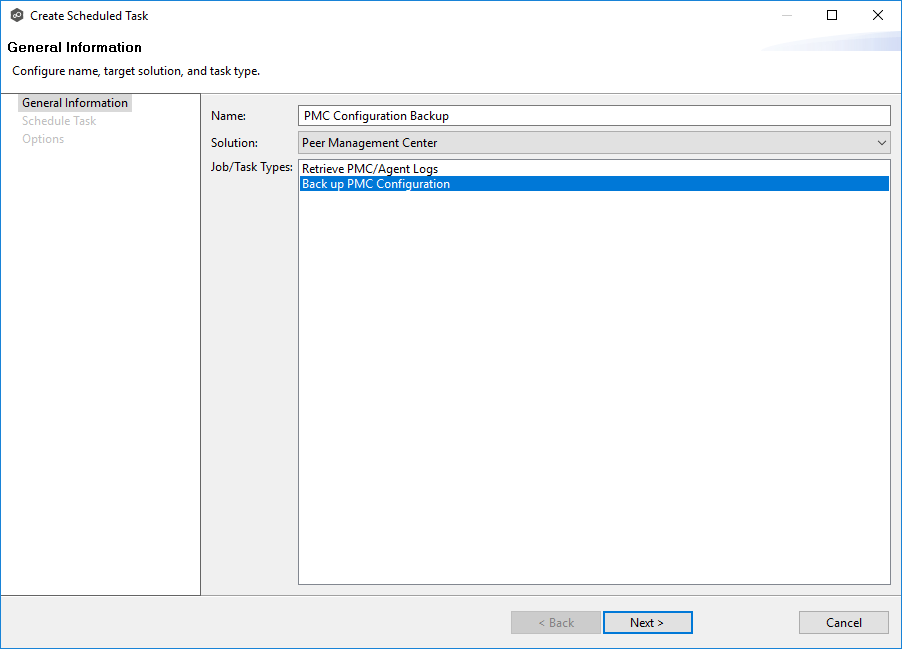
Click Next.
Select the backup frequency from the Settings options (One Time, Daily, Weekly, or Monthly); at least weekly is recommended).
Daily Allows selecting a recurring frequency of every 1, 2, 3, 5, 10, or 15 days. Weekly Requires selecting at least one day of the week to run on. Monthly Allows selecting All or specific month(s) in which to run, as well as any numbered day of the month or the Last day of selected month(s). Select the start date and time of the first backup.
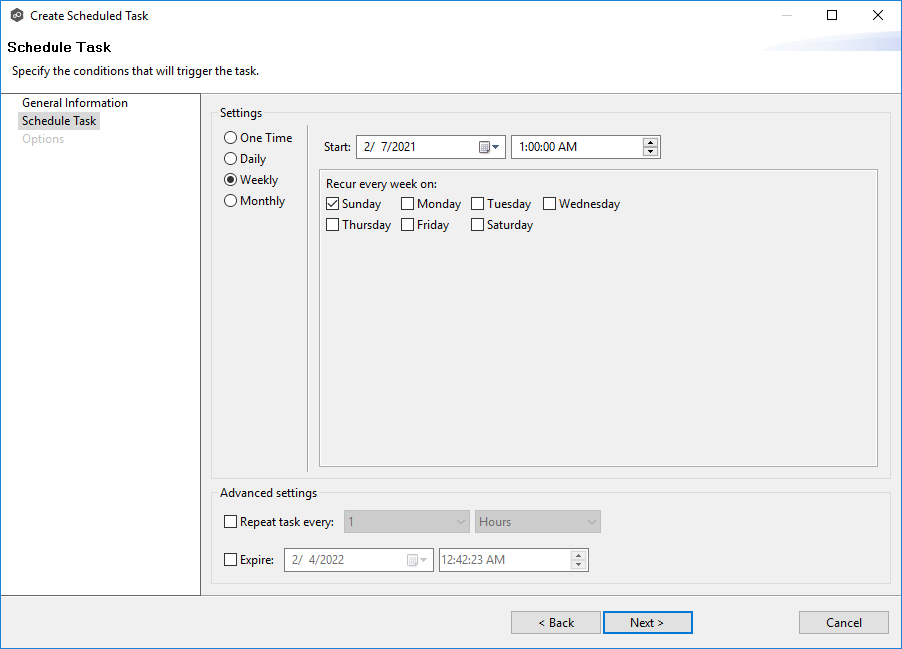
- Click Next.
- In the Target Path field, enter the UNC path to the PMC installation folder on the passive PMC server.
Use the admin path rather than a share path (for example, \\secondaryPMC-DNSname\c$\Program Files\Peer Software\Peer Management Center).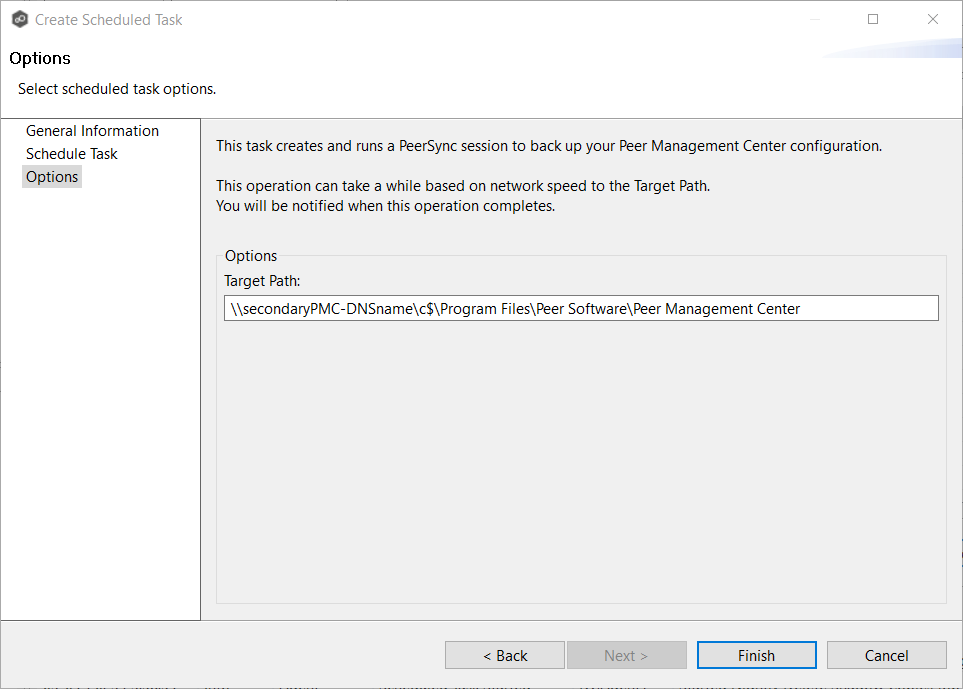
- Click Finish to save the backup task.
The backup task appears in the Task Scheduler's list of tasks.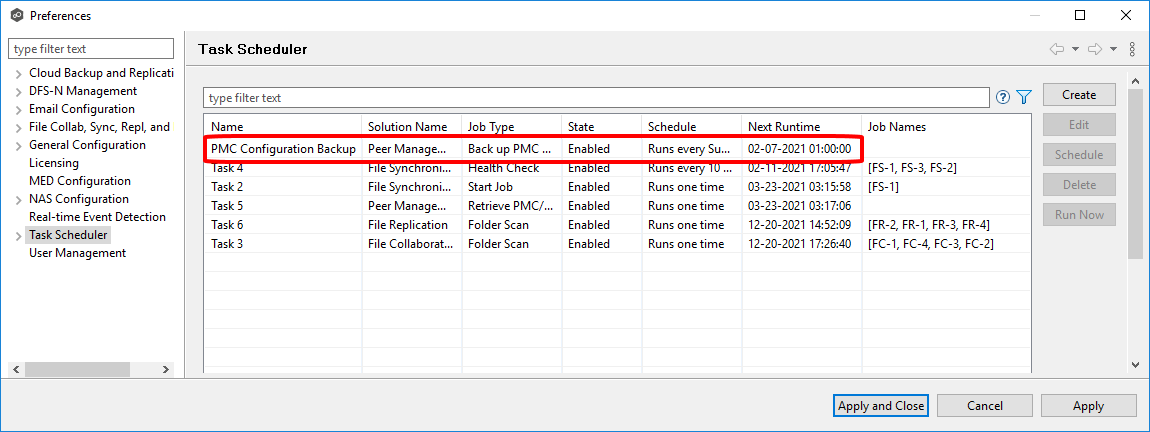
- (Optional) To create the initial backup, select the backup task, and then click the Run Now button.
Tip: The Task History view displays the details for past task runs (e.g. Start Time, End Time, Elapsed Time, any associated errors ).
To display the Task History view, select Show View from the Window menu, and then select View Task History.

Task 4. Configure Agents to Failover to the Passive Server
This section describes the steps required to configure all Agents to failing over to or from the backup server. It involves modifying the Broker configuration for each Agent.
PeerGFS v4.7 users only: To gain access to the Agent broker failover options, insert the following line into the workspace\hub.ini file in the PMC installation folder. Create the file if necessary.
JAVAhub.agent.enable.broker.secondary.ui=true- PeerGFS v4.7 users only:
Client Users: Restart the Peer Management Center Client application.
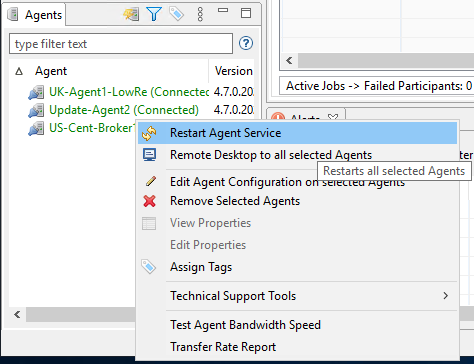
Web Client Users: Restart the Peer Management Center Web Service. - Within the Peer Management Center Client, select all Agents, right-click and select the Edit Agent Configuration on Selected Agents option.
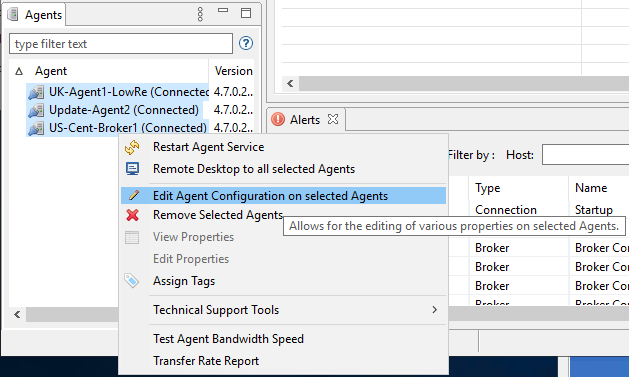
In the Broker Configuration section, add the failover broker IP address in the Failover Broker section (if there is an address already present, then add the new address separated by a comma). Set the other failover broker fields appropriately for your environment.
Note: Do not change the primary broker, even if there are multiple values in Broker Hosts. If a network of brokers is deployed, then ensure that both the active and passive PMC are included in one of the Broker Hosts fields.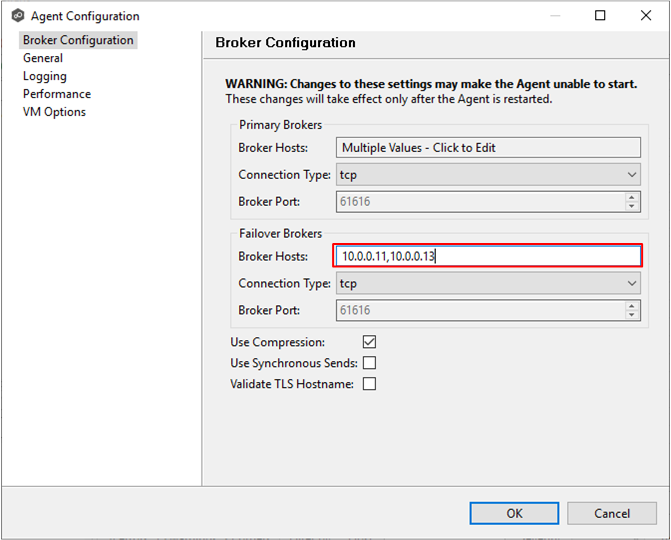
- Restart all Agents by selecting all Agents in the Agents view, and then right-clicking and selecting the Restart Agent Service option.
Recovering from a failure
This section describes the actions to take when the active PMC server fails. Recovering from a failure on the active PMC server involves:
- Failing over to the backup PMC server
- Failing back to the primary PMC server
Failover to the backup PMC server
If the primary (active) PMC server fails, follow these steps to make sure the passive PMC server takes on the primary role:
Ensure that the active PMC server is completely stopped. If the server has partially failed but is still running, disable the Peer Management services. This prevents the problems that occur if both the active and passive servers are running simultaneously.
To disable the Peer Services:
a. Log in to the primary (active) PMC server.
b. Open the Windows Services application.
c. Stop all the Peer services UNLESS you are using a network of brokers. If you are using a network of brokers, keep the Peer Management Broker Service and Peer Management Topology Service running.
d. Edit the properties of each of the stopped Peer services: Set Startup type to Manual, and then click OK to save.- Log in to the backup PMC server.
- Open the Windows Services application and start the Peer services on the backup server.
- Start the job(s).
Failback to the primary PMC server
Once the failure event has been resolved and you have access to the former primary PMC:
- Follow the recommendations in the Best Practices section prior to failing back.
- Return the primary server back to its active role:
- Stop and disable the Peer services on the backup PMC server.
- Start the Peer services on the primary PMC server.
- Start the job(s) that aren't set to automatically start.
Note: If you are using a network of brokers, you can leave the Peer Management Broker Service and Peer Management Topology Service running on both the active and passive PMC server.
Best Practices
Considerations during a failover event:
When the backup task runs from your primary PMC server, the entire current configuration, including the backup task itself, will be written to your secondary server. This means in the event of a failover, while you are running on your secondary PMC, the next time the backup task runs on this server, it will be trying to back up to itself (using the path that was configured on primary PMC server).
It is not recommended to run in a failover mode for a prolonged period of time. If you have to run on the secondary PMC for a prolonged period where configuration changes were made that need to be synced back to the primary PMC Server:
- Repeat Task 2 in the reverse direction, granting your secondary PMC server the rights to write to the primary PMC server.
- You must also edit your task on the secondary PMC server. Repeat Step 13 in Task 2 but modify the path of the backup task to include the primary server in the UNC path, rather than the secondary.
- Run the backup task one time prior to failing back to the primary PMC server.
- After failback to the primary PMC server, again edit the backup task to point to the UNC path of the secondary PMC server.
- It is recommended that you also create a secondary backup task that targets a central network share to store another backup. This will ensure you always have a backup you can restore manually to either PMC server in the event you run into any issues backing up directly between your PMC servers at any point.
- You will need to consider the hostname you use for your PeerGFS web server configuration if you intend to use the web access during a failover event. The web server port (default 8443) binds to the hostname specified in the configuration; you must ensure that you use a hostname that resolves to either PMC depending on which is the active one or use the default setting of "0.0.0.0", which should ensure access to either PMC web server using its NetBIOS/FQDN/IP address in the web server URL during normal operation or in the event of a failover event.
Related articles
- Achieving high availability for the PMC through active-passive configuration
- Achieving high availability for the PMC through active-passive configuration (v4.7.0 - v5.1.1)
- Achieving high availability for the PMC through active-passive configuration (v5.2 and later)
- Can a job back up files that were created between two specific dates?
- Can PeerSync change an IP address to point to a backup server?
- Firewall Requirements
- Getting Started with Network of Brokers
- Maximize network throughput
- Move a Peer Agent to another Windows server
- Peer Global File Service - Environmental Requirements
- PeerGFS jobs fail to start after initial job due to NetAPP ONTAP v9.15.1 upgrade
- PeerSync - Environmental Requirements
- Prerequisites
- Schedule upload of PMC and Agent logs to Peer Software Support
- Using a Peer Agent in a Windows Failover Cluster