
|
Last Updated |
23 June 2023 |
This article discusses how Peer Agent can work with clustered file server roles running on top of a Windows Failover Cluster. It also walks through the setup and configuration process for attaching a Peer Agent to a clustered file server role.
This document does not cover clustering a Peer Agent for use with an enterprise NAS device (from Dell, NetApp, or Nutanix).
In addition, a separate article covers Windows Failover Cluster support for Peer Management Center.
Overview
Windows Failover Clustering is a capability built into Windows Server 2008 Enterprise and later that allows multiple servers, called cluster nodes, to work together as a single system to provide continuous availability of applications and services, even in the event of hardware or software failures.
If a node fails or becomes unresponsive, the cluster automatically detects the failure and initiates a failover process, where the workload is transferred to another available node without interrupting the service. Within this clustering framework, an application or service is only operational on a single node at any given time.
A Peer Agent can be attached to and interact with a clustered file server role operating in a Windows Failover Cluster environment. Once attached, the Peer Agent service seamlessly operates within the context of the file server role, using the identical storage, IP address, and DNS name of the role. This means that all Agent capabilities are fully accessible, providing functionality equivalent to that of a standard Windows File Server. In the event that the cluster node actively hosting the file server role and the Peer Agent fails, both elements will automatically be moved and restarted on another node. After a brief period of time following the failover to another node, the Agent will reconnect and all jobs set to auto-start will begin.
The most important limitation of support within the Windows Failover Cluster environment is related to the state of running jobs when a failover occurs. In its current iteration, all jobs for the failing Agent will, at a minimum, require a rescan upon reconnect of the Agent from the new cluster node.
This document was written specifically for a Windows Server 2022 Failover Cluster. Different versions of Windows Server may require slightly different steps. Likewise, this document was written specifically for the cluster installer of Peer Agent v5.x. Older versions of Peer Agent are not supported when running in a Windows Failover Cluster.
Windows Failover Cluster is a powerful technology that can greatly improve the resiliency of software such as PeerGFS. With each version of Windows, Microsoft makes improvements to its capabilities, but they also tend to change the configuration interface and occasionally the terminology. In most cases, the changes are minor, but it is recommended that you check with Peer Software support (support@peersoftware.com) for up-to-date procedures.
Terminology
-
Windows Failover Cluster – A Microsoft technology that allows a group of independent servers to work together to increase the availability of applications and services.
-
Node – One of the physical or virtual Windows servers that make up a Failover Cluster. Only one node (or server) in the cluster will have the Agent and file server role active on it at a time.
-
Cluster Disk – The shared disk that hosts data that the active node will need to run the clustered service or services. It is not dependent on any node of the cluster.
-
Clustered Agent – In the context of this article, "clustered Agent" refers to a clustered file server role running the Peer Agent service. This cluster role runs within the Windows Failover Clustering environment and will have its own dedicated DNS name, IP address, and storage.
Prerequisites and notes
-
Before beginning the process of attaching a Peer Agent to a clustered file server role, two or more Windows Enterprise or Data Center Server systems must already be configured and running as part of a Windows Failover Cluster. Shared storage and network connectivity must already be in place. For more details on how to do this, please see the following Microsoft document: https://learn.microsoft.com/en-us/windows-server/failover-clustering/create-failover-cluster
-
Clustered shared volumes are not supported. Peer Agent can monitor changes only on cluster disks that are attached to specific clustered file server roles.
-
Scale-out file server roles are not supported. Peer Agent can integrate only with general use file server roles.
-
At least one dedicated cluster disk for use by the clustered file server role is required.
-
The Agent service account must be a member of the local Administrators group on each node.
-
Peer Management Center must already be installed and running on a separate Windows server or cluster role.
-
The Peer Agent service should never be started from the Windows Service Manager (services.msc) on a local node. It should only be controlled by the Failover Cluster Manager.
-
The Peer Agent cannot be upgraded from Peer Management Center. All upgrades must be performed manually. For more information, contact Peer Support.
-
Edge caching can be used on a failover cluster only where the Peer Agent is tied to a single file server role.
Step-by-step guide
To attach a Peer Agent to a clustered file server role:
-
Download and run the cluster version of the Peer Agent installer on one node of the cluster. You can install the cluster version by renaming the downloaded P-Agent_Installer_win64.exe file to P-Agent_Installer_win64_cluster.exe.

-
When prompted for where to install the Peer Agent, make sure it is a location on the local node. The installer's default location will work.
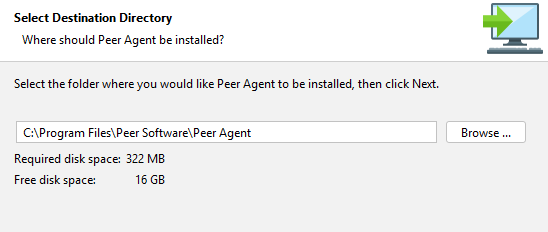
Select Destination Directory -
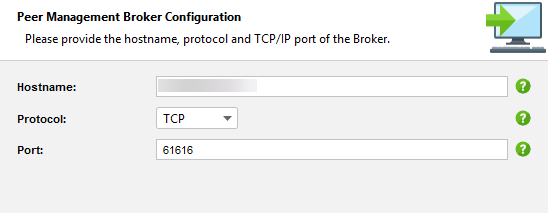
Enter the name or IP address of the Peer Management Center system or Peer Management Broker that this Agent should connect to, along with the desired protocol (TCP for unencrypted, SSL for TLS-based encryption).
-
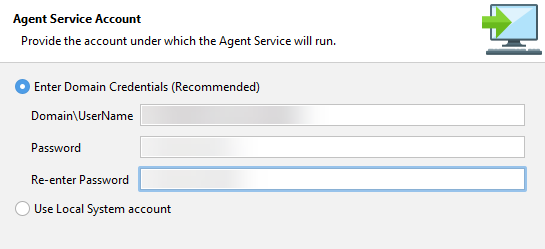
Enter the credentials for the Agent service account. This account must be an Active Directory user account that is a member of the local administrators group of each server node in the cluster.
-
When prompted, set the maximum number of file server roles that this particular cluster node can host at any given time.
• If you only have one file server role in your failover cluster, then set this to 1.
• If you have more file server roles, you will set this number higher. This value is currently limited to a maximum of 6. If your environment requires a higher number, please contact Peer Software support (support@peersoftware.com).
• If you wish to use edge caching, this value must be set to 1. Edge caching support for Windows Failover Cluster covers only a single file server role per cluster.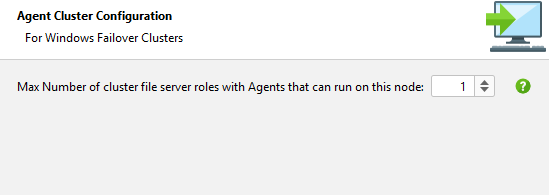
-
When prompted to provide Cluster Configuration, enter the name of the clustered file server role to which the Agent will be attached. In addition, enter a path on a clustered disk attached to this role that the Agent can use as a working directory. In the example below, the F drive is attached to clustered file server role as a cluster disk.
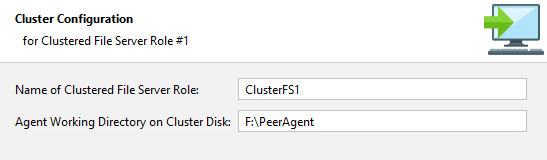
The working directory path will not be available on a node where the named clustered file server role is not active. This is normal. When the clustered file server role is activated on this node, the steps below will ensure that this path is available to the clustered Agent.
-
If, in Step 5, the maximum number of file server roles was set to value higher than 1, you will be prompted to repeat Step 6 for each clustered file server role. Each role should have a unique name and at least one dedicated cluster disk.
-
Repeat Steps 1 through 7 on each node of the cluster.
-
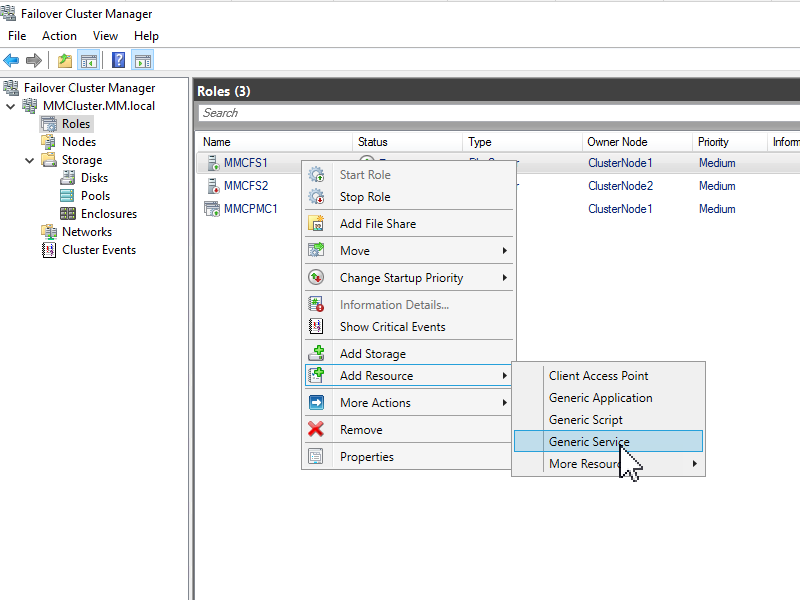
Once the Agent software is installed on all nodes, open the Failover Cluster Manager.
-
Find and right-click on the name of the appropriate clustered file server role, select Add a resource, and then select Generic Service.
-
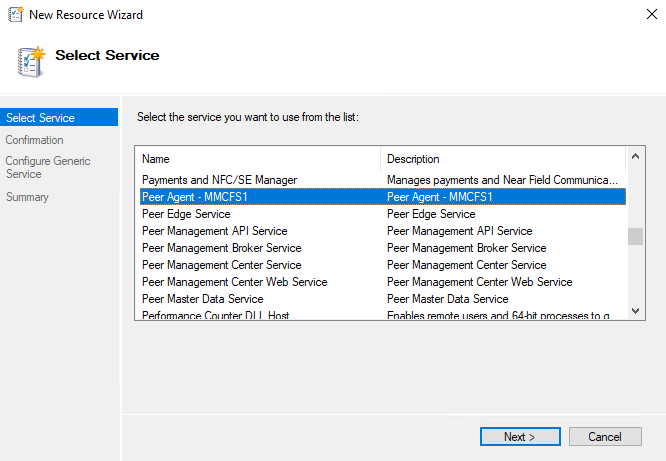
Find the Peer Agent service in the list that has the name of the appropriate clustered file server role (configured in Step 6), and then continue clicking the Next and Finished buttons until the wizard has finished.
-
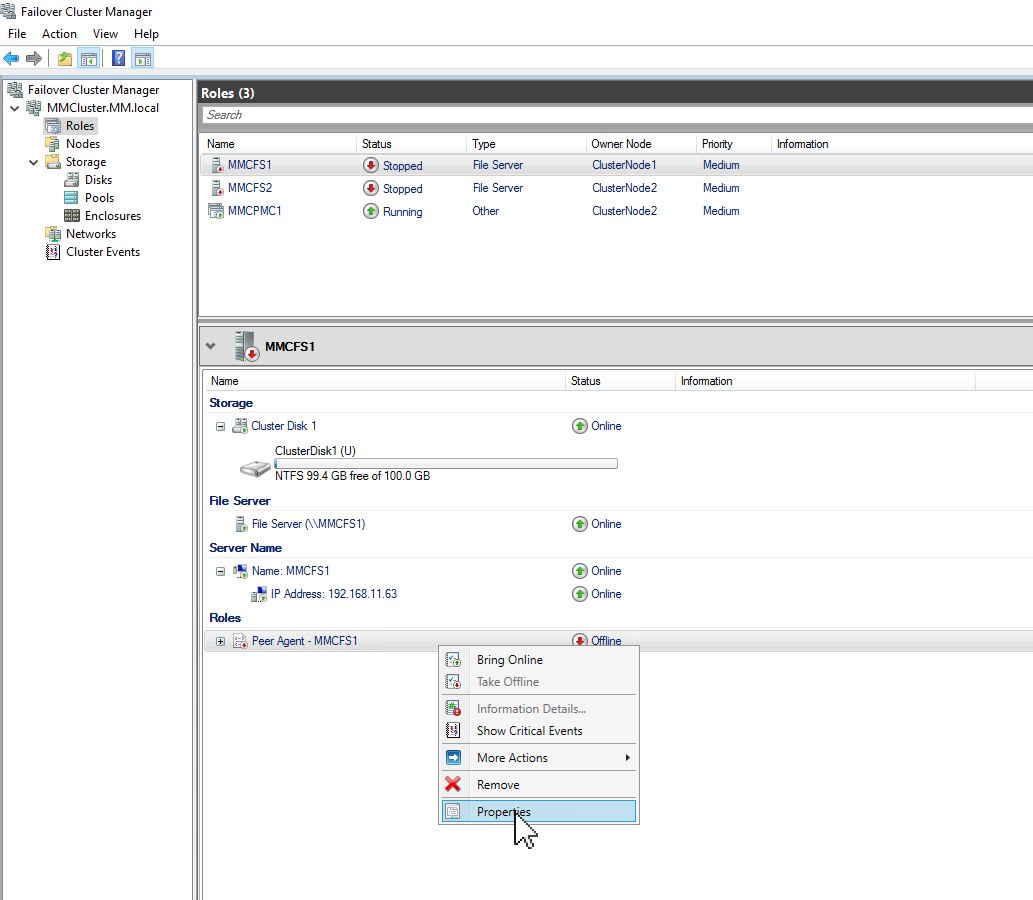
Open the properties of this newly added service.
-
Go to the Dependencies tab of the Properties dialog, and then add the following as dependencies (all joined by ANDs):
-
The file server resource.
-
The name of the clustered file server role.
-
The IP addressed assigned to the clustered file server role.
-
The corresponding cluster disk containing the working directory that was specified in Step 6.
-
-
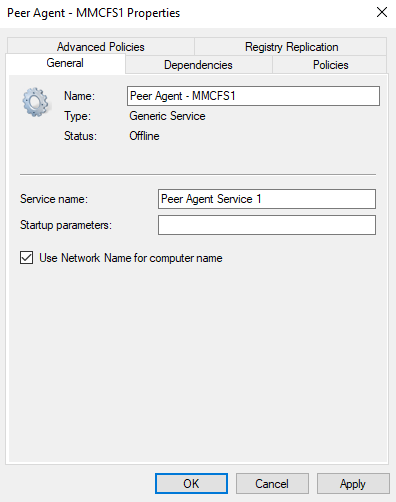
Once the options in Dependencies tab have been selected, open the General tab and ensure that Use Network Name for computer name is checked, and then click OK.
No startup parameters are needed.
-
In the center pane of the Failover Cluster Manager, find and right-click on the name of the clustered file server role, and then select Start Role.
-
Upon completion of these steps, go to the associated PMC server and verify that the status of the clustered Agent is connected in the Agents view (at the bottom left of the PMC window). The Agent name displayed in the Agents view should be that of the clustered file server role and not of the active node.
-
Repeat Steps 9 through 15 for each clustered file server role which will get a clustered Agent, as noted in Step 6.
Related articles
Page: Achieving high availability for the PMC through active-passive configuration Page: Achieving high availability for the PMC through active-passive configuration (v4.7.0 - v5.1.1) Page: Achieving high availability for the PMC through active-passive configuration (v5.2 only) Page: Achieving high availability for the PMC through active-passive configuration (v6.0 and later) Page: Can PeerSync change an IP address to point to a backup server? Page: Using a Peer Agent in a Windows Failover Cluster