
Overview
This article applies to PMC v4.0 and older.
You can configure the Agent installer to run attended and silently. This process relies on the Agent installer using a Response File, which stores the necessary information that is typically customized during a standard installation process.
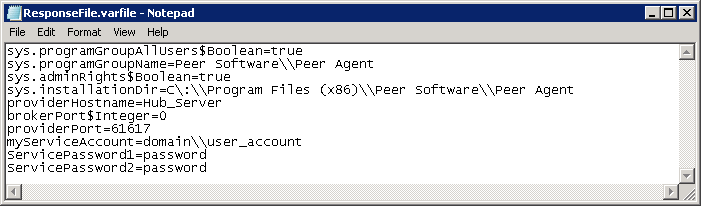
Example of a Response File:
If you want the Agent service to be configured and started automatically at the end of the unattended installation, you will need to store the service credentials in the Response File. Credential information is not encrypted in PMC v4.0 and older. Therefore, for security reasons, make sure you delete the Response File after the installation successfully completed.
Step-by-step guide
To configure the Agent installer to run unattended and silently:
-
Using a text editor, create a new text document called ResponseFile.varfile. You may also download it from here: ResponseFile.varfile
-
Add the following lines to the Response File:
sys.programGroupAllUsers$Boolean=true
sys.programGroupName=Peer Software\\Peer Agent
sys.adminRights$Boolean=true
sys.installationDir=C\:\\Program Files (x86)\\Peer Software\\Peer Agent
providerHostname=Hub_Server
brokerPort$Integer=0
providerPort=61617
myServiceAccount=domain\\user_account
ServicePassword1=password
ServicePassword2=password
-
Customize the fields as necessary:
Variable
Description
sys.programGroupAllUsers$Boolean=
Specify whether or not you want the Agent to be installed for all Users. Specify true or false.
sys.programGroupName=
Enter the Program Group in which the application will be installed. Be sure to use double backslashes.
For example: Peer Software\\Peer Agent
sys.adminRights$Boolean=
Specify whether or not the installation will require admin rights. Specify true or false.
sys.installationDir=
Specify the installation directory. Be sure to use double backslashes.
For example: C\:\\Program Files (x86)\\Peer Software\\Peer Agent
providerHostname=
Enter the name of the server where PeerGFS is running.
brokerPort$Integer=
Specify the TCP protocol that the Agent will be using:
0 = SSL
1 = TCPproviderPort=
Identify the port number the Agent will be using to communicate with the PeerGFS.
myServiceAccount=
Provide the service account information for the Agent service using the following format: domain\\user_name
ServicePassword1=
Enter the password for Agent service account. This will be stored in plain text format.
ServicePassword2=
Re-enter the password for the Agent service account. This will be stored in plain text format.
-
Use double backslashes wherever backslashes are needed as outlined in the examples.
-
If the service credentials are not provided, the Agent service will not start at the end of the installation.
-
-
You can place the Agent installation file and the Response File in a central location accessible by all the systems where the Agent will be installed. This will cause the installation to take place over the network and may be slow. Alternatively, you can distribute the Agent installation file to all systems where the Agent will be installed while keeping the Response File in a central location for security reasons.
-
Run the following at the command prompt or via a script on each of the systems where the Agent will be installed (make sure you run the script or command line as an administrator):
To run silently without the progress indicator:
Agent_Installer.exe -q -varfile "\\Location\To\The\ResponseFile.varfile"
To run unattended with the progress indicator:
Agent_Installer.exe -q -splash "Agent Installation" -varfile "\\Location\To\The\ResponseFile.varfile"
Related articles
Page: Back up your PeerGFS configuration manually Page: Cannot upgrade PeerIQ virtual appliance via the console menu Page: Cannot upgrade PMC virtual appliance via the console menu Page: Check for a new version of PeerGFS Page: Configure the Agent installer to run unattended Page: Configure the PeerSync Listener installer to run unattended Page: Connectivity issue during Agent update Page: How do I install Health Checker on a remote server? Page: Install a new PeerGFS license Page: Move a Peer Agent to another Windows server Page: Peer Software Lifecycle Policy Page: Update Peer Global File Service (PeerGFS) Page: Update PeerIQ Page: Upgrade Peer Global File Service (PeerGFS) Page: Upgrade PeerSync and PeerSync Listener