
|
Last Updated |
02 April 2024 |
Overview
This syslog-based integration requires a minimum of PeerGFS v5.2 and OneFS v9.5. PeerSync does not yet support this syslog-based integration. If your environment does not meet these requirements, you will need to use the CEE-based integration. See Dell PowerScale | EMC Isilon Configuration Guide for more information.
This guide steps you through configuring your environment to work with a Dell PowerScale storage platform in preparation for installing Peer Software solutions. Unlike previous integrations with Dell EMC Isilon that leveraged the Common Event Enabler, this guide covers using a new syslog-based connection. This new connection mechanism removes the need to install the Common Event Enabler, RabbitMQ, and supporting libraries, though it does require the use of TLS certificates.
Requirements
-
You are using PeerGFS v5.2 or later for SMB workloads or you are using PeerGFS v6.0 or later for NFS workloads. PeerSync is not currently supported.
-
Your Dell PowerScale storage device must be running OneFS v9.5.0 or later.
-
Local administrator rights are required for most of the installation and configuration tasks.
-
See Dell PowerScale Prerequisites for other requirements.
Terminology
-
isi – The PowerScale command line interface.
-
OneFS – The operating system of PowerScale storage clusters.
-
PowerScale - The current name of the scale-out Dell clustered storage platform.
-
SMB/CIFS – The Server Message Block (SMB) protocol is a network file-sharing protocol typically used by Windows-based clients. It supersedes Common Internet File System (CIFS), an earlier protocol. SMB is used in this document to refer to both protocols.
-
NFS - The Network File System protocol is a network file-sharing protocol typically used by Linux-based clients. Common versions include v3 and v4.
-
syslog – A messaging protocol commonly used for logging. With PowerScale, syslog is used to forward audit events to third-party servers.
Configuration Tasks
Task 1. Confirming Configuration Readiness
-
Ensure that the Dell PowerScale Prerequisites are met for the Peer Software solution you will be using.
-
Ensure that the PowerScale storage device is already configured to serve data via SMB or NFS. You should be able to access an SMB share or a NFS export from a client BEFORE attempting to continue.
-
Ensure that the date and time on the PowerScale storage device are synchronized with any associated domains and the server running the Peer Agent.
Task 2. Setting up TLS Certificates
In order to use syslog with OneFS, TLS certificates are required. Three main files are required:
-
A Certificate Authority (CA) certificate in PEM format. This is used to create server certificates and is uploaded into OneFS's web interface to help validate certificates.
-
A Certificate Signing Request (CSR) in PEM format. This is used by the CA to create a server certificate and is used as the private key on the Agent server to establish TLS connectivity.
-
A server certificate generated by the CA using the CSR, also in PEM format. This is also used by the Agent server to establish TLS connectivity.
The following steps will walk you through creating a CA, CSR, and server certificate using OpenSSL v1.1.1t. These steps are meant as guidelines and may vary depending on your CA, as well as the version of OpenSSL that you use. They are meant to be run from a workstation or server, NOT from within OneFS.
-
Generate a Certificate Authority using the following command:
Bashopenssl req -x509 -newkey rsa:4096 -nodes -days 3650 -keyout ca-key.pem -out ca-cert.pem -subj '/C=<2 LETTER COUNTRY CODE>/ST=<STATE>/L=<TOWN/LOCALITY>/O=<ORGANIZATION NAME>/OU=<DEPARTMENT NAME>/CN=CA/'Modify the -subj parameter to include appropriate details about your organization. We suggest including CN=CA at the end of the -subj parameter. Expiration length can be set as desired using the -days parameter.
-
Create an unencrypted Certificate Signing Request and key for the Peer Agent server using the following command. If you wish to use an encrypted CSR, skip this step and and continue with Step 3.
Bashopenssl req -new -nodes -out server.csr -newkey rsa:4096 -keyout server-key.pem -subj '/C=<2 LETTER COUNTRY CODE>/ST=<STATE>/L=<TOWN/LOCALITY>/O=<ORGANIZATION NAME>/OU=<DEPARTMENT NAME>/CN=<AGENT SERVER NAME>/'Modify the -subj parameter to include appropriate details about your organization but make sure they are not identical to the CA above. We suggest including CN=<AGENT SERVER NAME> at the end of the -subj parameter.
-
[OPTIONAL] If you wish to encrypt your server key as part of creating the CSR, you first need to generate the key using the following command:
openssl genrsa -aes256 -passout pass:"<PASSPHRASE>" -out server-key.pem 4096After creating the key, create the CSR for the Peer Agent server using the following command:
Bashopenssl req -new -out server.csr -key server-key.pem -subj '/C=<2 LETTER COUNTRY CODE>/ST=<STATE>/L=<TOWN/LOCALITY>/O=<ORGANIZATION NAME>/OU=<DEPARTMENT NAME>/CN=<AGENT SERVER NAME>/' -passin pass:"passphrase"Note: The -passin parameter can be omitted. If you leave it off the command line, you will be prompted for it later.
-
With v1.1.1t of OpenSSL, we've noticed that Subject Alterative Name (SAN) information was lost when adding it to the CSR using the -config parameter in Step 2. To compensate for this, you can add it to the certificate during signing by adding a new SAN section to the bottom of a openssl.cnf file. On Linux-based systems, you can make a copy of the cnf file found at /etc/ssl/openssl.cnf to use as a template. Make sure that the IP address of the Peer Agent server is correctly entered into the new [SAN] section.
Bash[SAN] subjectAltName=IP:<PEER AGENT SERVER IP>
-
Sign the CSR for the Peer Agent server using the following command:
Bashopenssl x509 -req -in server.csr -CA ca-cert.pem -CAkey ca-key.pem -CAcreateserial -out server-cert.pem -days 1095 -extensions SAN -extfile <PATH TO openssl.cnf FILE>
-
Copy the resulting server-cert.pem and server-key.pem files to the Peer Agent server, and then upload the ca-cert.pem file to the PowerScale web interface. If you created an encrypted CSR and server key, you will also need the passphrase from optional Step 3 above. That information will be requested in PeerGFS when you are setting up a new PowerScale-connected participant.
-
If you are creating certificates for multiple Peer Agent servers, repeat steps 2 through 6. Be sure to keep unique server-cert.pem, server.csr, and openssl.cnf files for each Peer Agent.
Task 3. Uploading the CA to OneFS
-
Copy the CA certificate (ca-cert.pem) to the cluster.
-
Log in into the OneFS web UI.
-
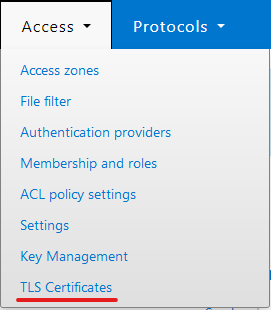
From the Access menu, select TLS Certificates.
-
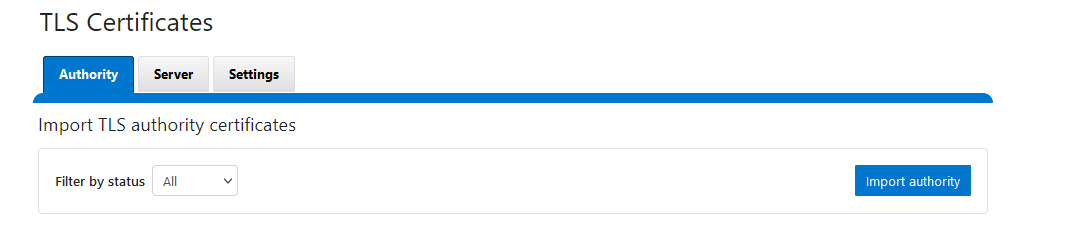
Using the Authority tab, click the Import authority button.
-
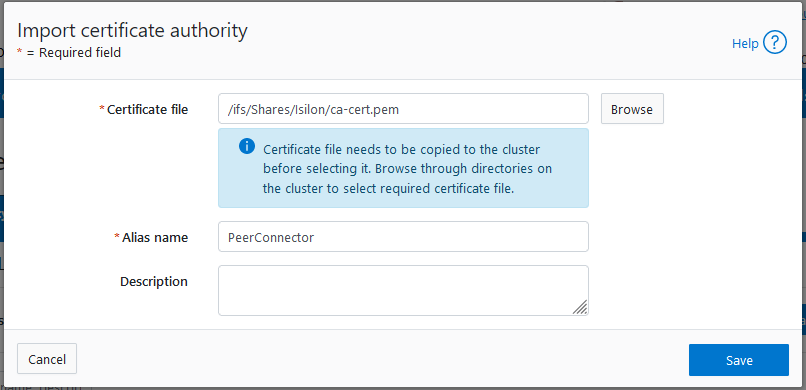
Find the certificate on the cluster using the Browse button, give it an alias unique to each Peer Agent, then click Save.
Troubleshooting
PowerScale Failing to Connect
PowerScale will refuse to connect to the Peer Agent server if SAN information is not correct. When that happens, you will see an error like the following in /var/log/isi_audit_syslog.log.
Failed to connect to:172.20.48.1:514, err:[SSL: CERTIFICATE_VERIFY_FAILED] certificate verify failed: IP address mismatch, certificate is not valid for '172.20.48.1'. (_ssl.c:1136), ca:/ifs/.ifsvar/modules/isi_certs/system/ca/zone_1/certs, crt:None
To check the certificate, run the following command:
openssl x509 -text -noout -in server-cert.pem
Verify that the certificate has a section like the following:
        X509v3 extensions:
            X509v3 Subject Alternative Name:
                IP Address:172.20.48.1
You can also verify the server certificate against the CA using:
openssl verify -CAfile ca-cert.pem server-cert.pem
Syslog Sending Old Events
Since syslog support within OneFS is designed for auditing, there are occasions where inbound events from the cluster are old and no longer applicable. If the cluster is sending events that are old and no longer applicable, you can configure the auditing system built into OneFS to send events starting from a specific point in time.
-
Open an SSH session on the PowerScale storage cluster as an administrator.
-
Enter the following command, replacing the date and time after the @ sign with the current date and time. For example:
isi audit settings global modify --syslog-log-time "Protocol@2023-07-01 12:00:00"
Technical Support
USA +1 703-763-7700
EMEA +49 89 2620763-22
UK/IE +44 20 777 098 22
Related Articles
Page: Achieving high availability for the PMC through active-passive configuration Page: Achieving high availability for the PMC through active-passive configuration (v4.7.0 - v5.1.1) Page: Achieving high availability for the PMC through active-passive configuration (v5.2 only) Page: Achieving high availability for the PMC through active-passive configuration (v6.0 and later) Page: Configuration Guides Page: Configure PeerSync to synchronize in a clustered environment Page: Configure the Agent installer to run unattended Page: Configure the PeerSync Listener installer to run unattended Page: Dell EMC Celerra | VNX | VNX 2 Configuration Guide Page: Dell PowerScale | EMC Isilon Configuration Guide Page: Dell PowerScale Syslog Configuration Guide Page: Dell PowerStore Configuration Guide Page: Dell Unity Configuration Guide Page: Dell Unity Legacy Configuration Guide Page: How do I install Health Checker on a remote server?